104-SpringBoot基础5-整合其他框架

1、整合 SpringMVC

虽然默认配置已经可以使用SpringMVC了,不过我们有时候需要进行自定义配置。

可以在 application.yml 文件中配置日志级别控制:

1
2
3
4
logging:
level:
com.itheima: debug
org.springframework: info

1.1 修改端口

查看SpringBoot的全局属性可知,端口通过以下方式配置:

1
2
3
# 映射端口
server:
port: 80

1.2 访问静态资源

现在,我们的项目是一个jar工程,那么就没有webapp,我们的静态资源该放哪里呢?回顾我们在上面看的源码,有一个叫做ResourceProperties的类,里面就定义了静态资源的默认查找路径:

默认的静态资源路径为:

  • classpath:/META-INF/resources/
  • classpath:/resources/
  • classpath:/static/
  • classpath:/public

只要静态资源放在这些目录中任何一个,SpringMVC都会帮我们处理。

我们习惯会把静态资源放在classpath:/static/目录下。我们创建目录 static,并且从 资料文件夹中复制 itcast.giftest.jsstatic 就可以访问了。

1.3 添加拦截器

拦截器也是我们经常需要使用的,在 SpringBoot 中该如何配置呢?拦截器不是一个普通属性,而是一个类,所以就要用到 java 配置方式了。在 SpringBoot 官方文档中有这么一段说明:

If you want to keep Spring Boot MVC features and you want to add additional MVC configuration (interceptors, formatters, view controllers, and other features), you can add your own @Configuration class of type WebMvcConfigurer but without @EnableWebMvc.
If you wish to provide custom instances of RequestMappingHandlerMapping , RequestMappingHandlerAdapter , or ExceptionHandlerExceptionResolver , you can declare a WebMvcRegistrationsAdapter instance to provide such components.
If you want to take complete control of Spring MVC, you can add your own @Configuration annotated with @EnableWebMvc .

翻译:

如果你想要保持Spring Boot 的一些默认MVC特征,同时又想自定义一些MVC配置(包括:拦截器,格式化器, 视图控制器、消息转换器 等等),你应该让一个类实现WebMvcConfigurer,并且添加 @Configuration 注解,但是千万不要加 @EnableWebMvc 注解。
如果你想要自定义HandlerMapping、HandlerAdapter、 ExceptionResolver等组件,你可以创建一个WebMvcRegistrationsAdapter实例 来提供以上组件。
如果你想要完全自定义SpringMVC,不保留SpringBoot提供的一切特征,你可以自己定义类并且添加 @Configuration 注解和 @EnableWebMvc 注解

总结:通过实现 WebMvcConfigurer 并添加 @Configuration 注解来实现自定义部分 SpringMvc 配置。

  1. 创建 src\main\java\com\itheima\interceptor\MyInterceptor.java 拦截器,内容如下:

    1
    2
    3
    4
    5
    6
    7
    8
    9
    10
    11
    12
    13
    14
    15
    16
    17
    18
    19
    20
    21
    package com.itheima.interceptor;
    import lombok.extern.slf4j.Slf4j;
    import org.springframework.web.servlet.HandlerInterceptor;
    import org.springframework.web.servlet.ModelAndView;
    import javax.servlet.http.HttpServletRequest;
    import javax.servlet.http.HttpServletResponse;
    @Slf4j
    public class MyInterceptor implements HandlerInterceptor {
    @Override
    public boolean preHandle(HttpServletRequest request, HttpServletResponse response, Object handler) throws Exception {
    log.debug("这是MyInterceptor拦截器的preHandle方法");
    return true;
    }
    @Override
    public void postHandle(HttpServletRequest request, HttpServletResponse response, Object handler, ModelAndView modelAndView) throws Exception {
    log.debug("这是MyInterceptor拦截器的postHandle方法");
    }
    public void afterCompletion(HttpServletRequest request, HttpServletResponseresponse, Object handler, Exception ex) throws Exception {
    log.debug("这是MyInterceptor拦截器的afterCompletion方法");
    }
    }
  2. 定义配置类 src\main\java\com\itheima\config\MvcConfig.java,用于注册拦截器,内容如下:

    1
    2
    3
    4
    5
    6
    7
    8
    9
    10
    11
    12
    13
    14
    15
    16
    17
    18
    19
    20
    21
    22
    23
    24
    25
    26
    package com.itheima.config;
    import com.itheima.interceptor.MyInterceptor;
    import org.springframework.context.annotation.Bean;
    import org.springframework.context.annotation.Configuration;
    import org.springframework.web.servlet.config.annotation.InterceptorRegistry;
    import org.springframework.web.servlet.config.annotation.WebMvcConfigurer;
    @Configuration
    public class MvcConfig implements WebMvcConfigurer {
    /**
    * 将拦截器注册到spring ioc容器
    * @return myInterceptor
    */
    @Bean
    public MyInterceptor myInterceptor(){
    return new MyInterceptor();
    }
    /**
    * 重写该方法;往拦截器链添加自定义拦截器
    * @param registry 拦截器链
    */
    @Override
    public void addInterceptors(InterceptorRegistry registry) {
    //通过registry添加myInterceptor拦截器,并设置拦截器路径为 /*
    registry.addInterceptor(myInterceptor()).addPathPatterns("/*");
    }
    }

结构如下:

接下来访问http://localhost/hello 并查看日志:

2 整合jdbc和事务

spring 中的 jdbc 连接和事务是配置中的重要一环,在 SpringBoot 中该如何处理呢?

答案是不需要处理,我们只要找到 SpringBoot 提供的启动器即可,在 pom.xml 文件中添加如下依赖:

1
2
3
4
<dependency>
<groupId>org.springframework.boot</groupId>
<artifactId>spring-boot-starter-jdbc</artifactId>
</dependency>

当然,不要忘了数据库驱动,SpringBoot 并不知道我们用的什么数据库,这里我们选择 MySQL;同样的在 pom.xml 文件中添加如下依赖

1
2
3
4
5
<dependency>
<groupId>mysql</groupId>
<artifactId>mysql-connector-java</artifactId>
<version>5.1.46</version>
</dependency>

至于事务,SpringBoot 中通过注解来控制。就是我们熟知的 @Transactional 使用的时候设置在对应的类或方法上即可。

创建 src\main\java\com\itheima\service\UserService.java 业务类如下:

1
2
3
4
5
6
7
8
9
10
11
12
13
14
15
package com.itheima.service;
import com.itheima.pojo.User;
import org.springframework.stereotype.Service;
import org.springframework.transaction.annotation.Transactional;
@Service
public class UserService {
public User queryById(Long id){
//根据id查询
return new User();
}
@Transactional
public void saveUser(User user){
System.out.println("新增用户...");
}
}

3 整合连接池

其实,在刚才引入 jdbc 启动器的时候,SpringBoot 已经自动帮我们引入了一个连接池:HikariCP

HikariCP 应该是目前速度 快的连接池了,我们看看它与c3p0的对比:
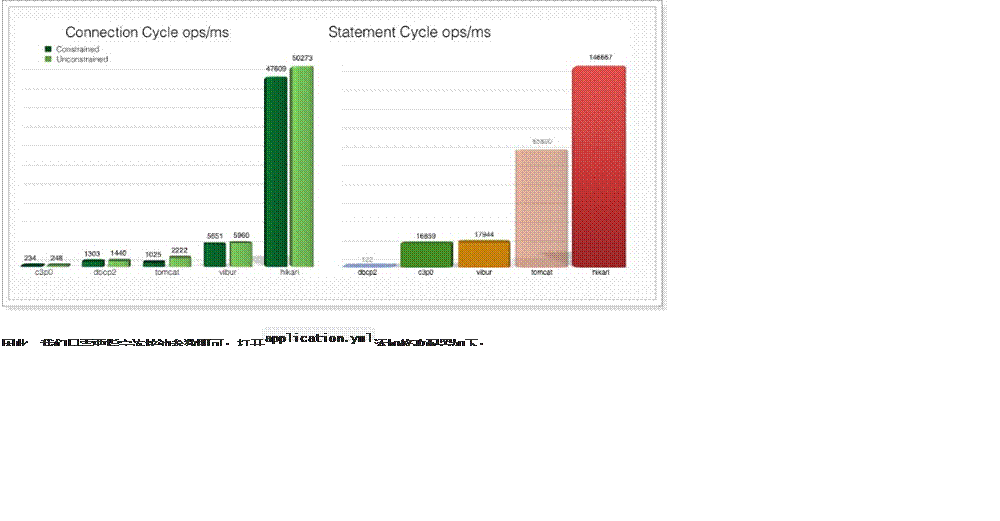
因此,我们只需要指定连接池参数即可;打开 application.yml 添加修改配置如下:

1
2
3
4
5
6
spring:
datasource:
driver-class-name: com.mysql.jdbc.Driver
url: jdbc:mysql://localhost:3306/springboot_test
username: root
password: root

【注意】把 JdbcConfig 类中的 druid 的配置删除或注释;

启动项目,访问 http://localhost/hello ;查看后台输出,一样可以在 HelloController 中获取到datasource。

4 SpringBoot 整合 Mybatis

4.1 添加Mybatis的起步依赖

SpringBoot 官方并没有提供 Mybatis 的启动器,不过 Mybatis 官网自己实现了。在项目的 pom.xml 文件中加入如下依赖:

1
2
3
4
5
6
<!--mybatis起步依赖-->
<dependency>
<groupId>org.mybatis.spring.boot</groupId>
<artifactId>mybatis-spring-boot-starter</artifactId>
<version>2.0.1</version>
</dependency>

4.2 添加数据库驱动坐标

1
2
3
4
5
<!-- MySQL连接驱动 -->
<dependency>
<groupId>mysql</groupId>
<artifactId>mysql-connector-java</artifactId>
</dependency>

4.3 添加数据库连接信息

application.properties 中添加数据量的连接信息

1
2
3
4
5
#DB Configuration:
spring.datasource.driverClassName=com.mysql.jdbc.Driver
spring.datasource.url=jdbc:mysql://127.0.0.1:3306/test?useUnicode=true&characterEncoding=utf8
spring.datasource.username=root
spring.datasource.password=root

或者配置 application.yml,常用配置如下

1
2
3
4
5
6
7
8
9
# mybatis配置
mybatis:
# 实体类别名包路径
type-aliases-package: com.itheima.pojo
# 映射文件路径
# mapper-locations: classpath:mappers/*.xml
configuration:
# 控制台输出执行sql
log-impl: org.apache.ibatis.logging.stdout.StdOutImpl

4.4 创建user表

在test数据库中创建user表

1
2
3
4
5
6
7
8
9
10
11
DROP TABLE IF EXISTS `user`;
CREATE TABLE `user` (
`id` int(11) NOT NULL AUTO_INCREMENT,
`username` varchar(50) DEFAULT NULL,
`password` varchar(50) DEFAULT NULL,
`name` varchar(50) DEFAULT NULL,
PRIMARY KEY (`id`)
) ENGINE=InnoDB AUTO_INCREMENT=10 DEFAULT CHARSET=utf8;

INSERT INTO `user` VALUES ('1', 'zhangsan', '123', '张三');
INSERT INTO `user` VALUES ('2', 'lisi', '123', '李四');

4.5 创建实体Bean

1
2
3
4
5
6
7
8
9
10
11
12
public class User {
// 主键
private Long id;
// 用户名
private String username;
// 密码
private String password;
// 姓名
private String name;

//此处省略getter和setter方法 .. ..
}

4.6 编写Mapper

需要注意,这里没有配置 Mapper 接口扫描包,因此我们需要给每一个 Mapper 接口添加 @Mapper 注解,才能被识别。

@Mapper 标记该类是一个 mybatis 的 Mapper 接口,可以被 spring boot 自动扫描到 spring 上下文中

1
2
3
4
@Mapper
public interface UserMapper {
public List<User> queryUserList();
}

或者,我们也可以不加注解,而是在启动类上添加扫描包注解(推荐):

1
2
3
4
5
6
7
8
@SpringBootApplication
@MapperScan("com.itheima.mapper")
public class Application {
public static void main(String[] args) {
// 启动代码
SpringApplication.run(Application.class, args);
}
}

4.7 配置Mapper映射文件

src\main\resources\mapper 路径下加入 UserMapper.xml 配置文件”

1
2
3
4
5
6
7
<?xml version="1.0" encoding="utf-8" ?>
<!DOCTYPE mapper PUBLIC "-//mybatis.org//DTD Mapper 3.0//EN" "http://mybatis.org/dtd/mybatis-3-mapper.dtd" >
<mapper namespace="com.itheima.mapper.UserMapper">
<select id="queryUserList" resultType="user">
select * from user
</select>
</mapper>

4.8 在 application.properties 中添加mybatis的信息

1
2
3
4
5
#spring集成Mybatis环境
#pojo别名扫描包
mybatis.type-aliases-package=com.itheima.domain
#加载Mybatis映射文件
mybatis.mapper-locations=classpath:mapper/*Mapper.xml

4.9 编写测试 Controller

1
2
3
4
5
6
7
8
9
10
11
12
13
@Controller
public class MapperController {

@Autowired
private UserMapper userMapper;

@RequestMapping("/queryUser")
@ResponseBody
public List<User> queryUser(){
List<User> users = userMapper.queryUserList();
return users;
}
}

4.10 测试

4 通用 Mapper

  1. 通用Mapper的作者也为自己的插件编写了启动器,我们直接引入即可。在项目的 pom.xml 文件中加入如下依赖:

    1
    2
    3
    4
    5
    6
    <!-- 通用mapper -->
    <dependency>
    <groupId>tk.mybatis</groupId>
    <artifactId>mapper-spring-boot-starter</artifactId>
    <version>2.1.5</version>
    </dependency>

    注意:一旦引入了通用Mapper的启动器,会覆盖Mybatis官方启动器的功能,因此需要移除对官方Mybatis启动器的依赖。

  2. 编写UserMapper
    无需任何配置就可以使用了。如果有特殊需要,可以到通用mapper官网查看:https://github.com/abel533/Mapper/wiki/3.config
    编写 src\main\java\com\itheima\mapper\UserMapper.java 如下:

    1
    2
    3
    4
    5
    package com.itheima.mapper;
    import com.itheima.pojo.User;
    import tk.mybatis.mapper.common.Mapper;
    public interface UserMapper extends Mapper<User> {
    }
  3. 把启动类上的@MapperScan注解修改为通用mapper中自带的:

    1
    2
    3
    4
    5
    6
    @SpringBootApplication
    @MapperScan("com.itheima.mapper")
    public static void main(String[] args) {
    // 启动代码
    SpringApplication.run(Application.class, args);
    }
  4. 在User实体类上加JPA注解
    修改 src\main\java\com\itheima\pojo\User.java 如下:

    1
    2
    3
    4
    5
    6
    7
    8
    9
    10
    11
    12
    13
    14
    15
    16
    17
    18
    19
    20
    21
    22
    23
    24
    25
    26
    27
    @Data
    @Table(name = "tb_user")
    public class User{
    // id
    @Id
    //开启主键自动回填
    @KeySql(useGeneratedKeys = true)
    private Long id;
    // 用户名
    private String userName;
    // 密码
    private String password;
    // 姓名
    private String name;
    // 年龄
    private Integer age;
    // 性别,1男性,2女性
    private Integer sex;
    // 出生日期
    private Date birthday;
    // 创建时间
    private Date created;
    // 更新时间
    private Date updated;
    // 备注
    private String note;
    }
  5. 对 UserService 的代码进行简单改造

    1
    2
    3
    4
    5
    6
    7
    8
    9
    10
    11
    12
    13
    14
    @Service
    public class UserService {
    @Autowired
    private UserMapper userMapper;
    public User queryById(Long id){
    //根据id查询
    return userMapper.selectByPrimaryKey(id);
    }
    @Transactional
    public void saveUser(User user){
    System.out.println("新增用户...");
    userMapper.insertSelective(user);
    }
    }
  6. 将 HelloController 进行简单改造:

    1
    2
    3
    4
    5
    6
    7
    8
    9
    10
    11
    12
    13
    14
    @RestController
    public class HelloController {
    @Autowired
    private UserService userService;
    /**
    * 根据id获取用户
    * @param id 用户id
    * @return 用户
    */
    @GetMapping("/user/{id}")
    public User queryById(@PathVariable Long id){
    return userService.queryById(id);
    }
    }

5 SpringBoot 整合Spring Data JPA

5.1 添加Spring Data JPA的起步依赖

1
2
3
4
5
<!-- springBoot JPA的起步依赖 -->
<dependency>
<groupId>org.springframework.boot</groupId>
<artifactId>spring-boot-starter-data-jpa</artifactId>
</dependency>

5.2 添加数据库驱动依赖

1
2
3
4
5
<!-- MySQL连接驱动 -->
<dependency>
<groupId>mysql</groupId>
<artifactId>mysql-connector-java</artifactId>
</dependency>

5.3 在application.properties中配置数据库和jpa的相关属性

1
2
3
4
5
6
7
8
9
10
11
12
#DB Configuration:
spring.datasource.driverClassName=com.mysql.jdbc.Driver
spring.datasource.url=jdbc:mysql://127.0.0.1:3306/test?useUnicode=true&characterEncoding=utf8
spring.datasource.username=root
spring.datasource.password=root

#JPA Configuration:
spring.jpa.database=MySQL
spring.jpa.show-sql=true
spring.jpa.generate-ddl=true
spring.jpa.hibernate.ddl-auto=update
spring.jpa.hibernate.naming_strategy=org.hibernate.cfg.ImprovedNamingStrategy

5.4 创建实体配置实体

1
2
3
4
5
6
7
8
9
10
11
12
13
14
15
@Entity
public class User {
// 主键
@Id
@GeneratedValue(strategy = GenerationType.IDENTITY)
private Long id;
// 用户名
private String username;
// 密码
private String password;
// 姓名
private String name;

//此处省略setter和getter方法... ...
}

5.5 编写UserRepository

1
2
3
public interface UserRepository extends JpaRepository<User,Long>{
public List<User> findAll();
}

5.6 编写测试类

1
2
3
4
5
6
7
8
9
10
11
12
13
@RunWith(SpringRunner.class)
@SpringBootTest(classes=MySpringBootApplication.class)
public class JpaTest {

@Autowired
private UserRepository userRepository;

@Test
public void test(){
List<User> users = userRepository.findAll();
System.out.println(users);
}
}

5.7 控制台打印信息

注意:如果是jdk9,执行报错如下:

原因:jdk缺少相应的jar

解决方案:手动导入对应的maven坐标,如下:

1
2
3
4
5
6
<!--jdk9需要导入如下坐标-->
<dependency>
<groupId>javax.xml.bind</groupId>
<artifactId>jaxb-api</artifactId>
<version>2.3.0</version>
</dependency>

6 SpringBoot整合Junit

6.1 添加Junit的起步依赖

1
2
3
4
5
6
<!--测试的起步依赖-->
<dependency>
<groupId>org.springframework.boot</groupId>
<artifactId>spring-boot-starter-test</artifactId>
<scope>test</scope>
</dependency>

6.2 编写测试类

在测试类上面必须要添加 @SpringBootTest 注解。

1
2
3
4
5
6
7
8
9
10
11
12
13
14
15
16
17
18
19
20
21
22
23
24
25
26
package com.itheima.test;

import com.itheima.MySpringBootApplication;
import com.itheima.domain.User;
import com.itheima.mapper.UserMapper;
import org.junit.Test;
import org.junit.runner.RunWith;
import org.springframework.beans.factory.annotation.Autowired;
import org.springframework.boot.test.context.SpringBootTest;
import org.springframework.test.context.junit4.SpringRunner;

import java.util.List;

@RunWith(SpringRunner.class)
@SpringBootTest(classes = MySpringBootApplication.class)
public class MapperTest {

@Autowired
private UserMapper userMapper;

@Test
public void test() {
List<User> users = userMapper.queryUserList();
System.out.println(users);
}
}

其中,

SpringRunner继承自SpringJUnit4ClassRunner,使用哪一个Spring提供的测试测试引擎都可以

1
public final class SpringRunner extends SpringJUnit4ClassRunner

@SpringBootTest的属性指定的是引导类的字节码对象

6.3 控制台打印信息

7 SpringBoot整合Redis

7.1 添加redis的起步依赖

1
2
3
4
5
<!-- 配置使用redis启动器 -->
<dependency>
<groupId>org.springframework.boot</groupId>
<artifactId>spring-boot-starter-data-redis</artifactId>
</dependency>

7.2 配置redis的连接信息

1
2
3
# Redis
spring.redis.host=127.0.0.1
spring.redis.port=6379

或者配置 application.yml 文件;

1
2
3
4
spring:
redis:
host: localhost
port: 6379

7.3 注入RedisTemplate测试redis操作

1
2
3
4
5
6
7
8
9
10
11
12
13
14
15
16
17
18
19
20
21
22
23
24
25
26
27
28
29
30
@RunWith(SpringRunner.class)
@SpringBootTest(classes = SpringbootJpaApplication.class)
public class RedisTest {

@Autowired
private UserRepository userRepository;

@Autowired
private RedisTemplate<String, String> redisTemplate;

@Test
public void test() throws JsonProcessingException {
//从redis缓存中获得指定的数据
String userListData = redisTemplate.boundValueOps("user.findAll").get();
//如果redis中没有数据的话
if(null==userListData){
//查询数据库获得数据
List<User> all = userRepository.findAll();
//转换成json格式字符串
ObjectMapper om = new ObjectMapper();
userListData = om.writeValueAsString(all);
//将数据存储到redis中,下次在查询直接从redis中获得数据,不用在查询数据库
redisTemplate.boundValueOps("user.findAll").set(userListData);
System.out.println("===============从数据库获得数据===============");
}else{
System.out.println("===============从redis缓存中获得数据===============");
}
System.out.println(userListData);
}
}

104-SpringBoot基础5-整合其他框架
https://flepeng.github.io/021-Java-01-course-104-SpringBoot基础5-整合其他框架/
作者
Lepeng
发布于
2020年2月2日
许可协议