1、Swagger的介绍
1.1 Swagger的概述
前后端分离开发,后端需要编写接口说明文档,接口文档其实是开发之前双方之间的一种约定。
通常接口文档分为离线的和实时的:
离线的接口文档需要程序员在上面编写,通常是由开发人员先在离线接口文档上编写信息,然后交给前端人员参照开发。最大的弊端是当我们的接口程序发生变动时,需要回过头来修改上面的内容。实时接口文档就是可以根据我们的代码来自动生成相应的接口文档,优点就是我们的代码发生变化时,生成的接口文档也会自动更新,无需我们关注修改,只需要按时发布即可。
swagger是一个用于生成服务器接口规范性文档,并且能够对接口进行测试的工具
swagger分为swagger2和swagger3两个常用版本。二者区别不是很大,主要对于依赖和注解进行了优化。swagger2需要引入2个jar包,swagger3只需要一个,用起来没有什么大的区别。
1.2 Swagger的作用
2、SpringBoot集成Swagger
2.1 添加依赖
maven 仓库地址:https://mvnrepository.com/search?q=swagger
在pom.xml添加依赖(swagger2、swagger-UI)
1
2
3
4
5
6
7
8
9
10
11
12
13
14
| <dependencies>
<dependency>
<groupId>io.springfox</groupId>
<artifactId>springfox-swagger2</artifactId>
<version>2.9.2</version>
</dependency>
<dependency>
<groupId>io.springfox</groupId>
<artifactId>springfox-swagger-ui</artifactId>
<version>2.9.2</version>
</dependency>
</dependencies>
|
2.2 配置Swagger
创建swagger的配置类(Java配置方式)
在创建的类上添加
@Configuration 声明为配置类@EnableSwagger2 声明在项目中开启了Swagger的功能
在主程序同级包下创建config包,并在包里创建 SwaggerConfig 类。可以添加一个Docket配置。
所谓Docket配置,就是一组(一个项目或一个版本)接口文档的配置,比如设置名称,联系人等等。
1
2
3
4
5
6
7
8
9
10
11
12
13
14
15
16
17
18
19
20
21
22
23
24
25
26
27
28
29
30
31
32
33
34
35
36
37
38
39
40
41
42
43
44
45
46
47
48
49
50
51
| @Configuration
@EnableSwagger2
public class SwaggerConfig {
@Bean
public Docket getDocket(){
ApiInfoBuilder apiInfoBuilder = new ApiInfoBuilder();
apiInfoBuilder.title("《xxxx》后端接口说明")
.description("此文档详细说明了商城项目后端接口规范")
.version("v 1.0.1")
.contact(new Contact("lepeng","https://blog.csdn.net/fenglepeng","flepeng@163.com"));
ApiInfo apiInfo = apiInfoBuilder.build();
Docket docket = new Docket(DocumentationType.SWAGGER_2)
.apiInfo(apiInfo)
.select()
.apis(RequestHandlerSelectors.basePackage("com.flepengl.controllers"))
.paths(PathSelectors.ant("/ttttt/**"))
.build();
return docket;
}
}
|
2.3 启动项目
如果出现报错 Failed to start bean 'documentationPluginsBootstrapper':nested exception...
这个问题的主要原因是 SpringBoot版本过高导致。Spring Boot 2.6.X 使用 PathPatternMatcher 匹配路径,Swagger 引用的 Springfox 使用的路径匹配是基于 AntPathMatcher的。
如果是SpringBoot2.5.x及之前版本可以正常运行。
解决方法 :
在springBoot配置文件中添加如下配置即可
1
| spring.mvc.pathmatch.matching-strategy=ANT_PATH_MATCHER
|
2.4 测试
访问地址:http://localhost:8080/swagger-ui.html 出现下面界面则配置成功

3、更改Swagger的界面风格
3.1 添加依赖
在pom.xml中添加依赖
1
2
3
4
5
| <dependency>
<groupId>com.github.xiaoymin</groupId>
<artifactId>swagger-bootstrap-ui</artifactId>
<version>1.9.6</version>
</dependency>
|
3.2 创建配置类
添加一个配置类,让他实现 WebMvcConfigurer 接口
1
2
3
4
5
6
7
8
9
10
11
12
13
| @Configuration
public class WebMvcConfig implements WebMvcConfigurer {
@Override
public void addResourceHandlers(ResourceHandlerRegistry registry) {
registry.addResourceHandler("/**").addResourceLocations("classpath:/static/");
registry.addResourceHandler("swagger-ui.html")
.addResourceLocations("classpath:/META-INF/resources/");
registry.addResourceHandler("/webjars/**")
.addResourceLocations("classpath:/META-INF/resources/webjars/");
registry.addResourceHandler("doc.html")
.addResourceLocations("classpath:/META-INF/resources/");
}
}
|
3.3 测试
重启项目,访问http://localhost:8080/doc.html 风格更改成功,这种风格的界面也是用的比较多的。
4、分组
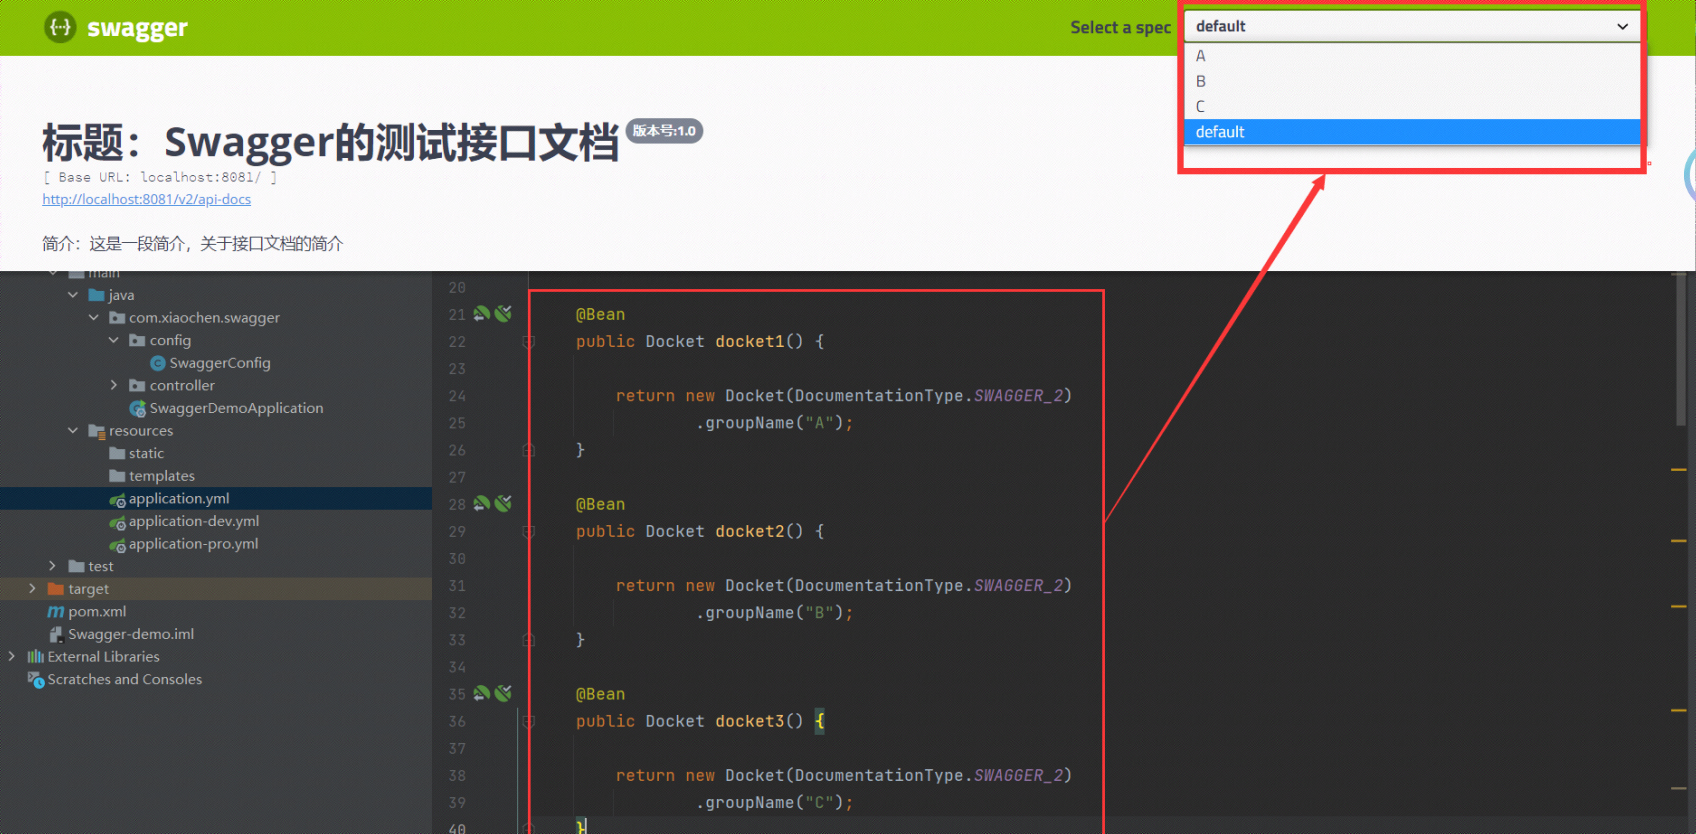
在没有设置Swagger的分组之前,有一个默认的default分组,分组个数的多少就取决于SwaggerConfig 配置类中有多少个Docket 实例,
值得注意的是:不能出现同名的分组,即使是未命名的分组(也就是default)也不能重复出现,否则就会报 java.lang.IllegalStateException 异常

5、Swagger注解
Swagger提供了一套注解,可以对每个接口进行详细的说明
1
2
3
4
5
6
7
8
9
10
11
| @Api:修饰整个类,描述Controller的作用
@ApiOperation:描述一个类的一个方法,或者说一个接口
@ApiParam:单个参数描述
@ApiModel:用对象来接收参数
@ApiProperty:用对象接收参数时,描述对象的一个字段
@ApiResponse:HTTP响应其中1个描述
@ApiResponses:HTTP响应整体描述
@ApiIgnore:使用该注解忽略这个API
@ApiError:发生错误返回的信息
@ApiImplicitParam:一个请求参数
@ApiImplicitParams:多个请求参数
|
5.1 @API 类注解,在控制器类添加此注解,可以对控制器类进行功能说明
1
2
| @Api(value = "提供用户列表接口",tags = "用户管理")
@Api(value = "提供商品的添加,删除,列表功能接口...",tags = "商品管理")
|
5.2 @ApiOperation 方法注解,说明接口方法的作用
1
2
3
4
| @ApiOperation(value = "根据 id 获取敏感数据规则", notes = "根据 id 获取敏感数据规则")
public SensitiveDataRule getSensitiveDataRule(@PathVariable String id) {
return sensitiveDataRuleService.getSensitiveDataRule(id);
}
|
5.3. @ApiImplicitParams 和 @ApiImplicitParam 方法注解,说明接口方法的参数
1
2
3
4
5
6
7
8
9
10
11
12
13
14
15
| @ApiOperation("用户登录接口")
@ApiImplicitParams({
@ApiImplicitParam(dataType = "string",name = "username",value = "用户登录账号",required = true),
@ApiImplicitParam(dataType = "string",name = "password",value = "用户登录密码",required = false,defaultValue = "123456")
})
@RequestMapping(value = "/login",method = RequestMethod.GET)
public ResultVo login(@RequestParam("username") String name,
@RequestParam(value = "password",defaultValue = "123456") String pwd){
User user = userService.checkLogin(name, pwd);
if(user == null){
return new ResultVo(10001,"登录失败",null);
}else {
return new ResultVo(10000,"登录成功",user);
}
}
|
@ApiImplicitParam的参数:
name(必需):指定参数的名称。value(可选):对参数的简单描述。dataType(必需):指定参数的数据类型。paramType(必需):指定参数的类型,可以是path、query、body、header或form。
path:路径参数。参数值直接包含在URL的路径中,用于标识资源的唯一标识符。例如:/users/{id}中的{id}就是路径参数。query:查询参数。参数以键值对的形式附加在URL的查询字符串中。例如:/users?name=john&age=25中的name和age就是查询参数。body:请求体参数。参数值包含在请求的消息体中。通常用于POST、PUT等请求方法,传递复杂的对象或数据。参数的格式可以是JSON、XML等。使用@RequestBody注解来接收该参数。header:请求头参数。参数以键值对的形式包含在请求的头部信息中。常用于传递身份验证凭证、请求格式等。使用@RequestHeader注解来接收该参数。form:表单参数。参数以键值对的形式提交表单数据。常用于表单提交方式,例如application/x-www-form-urlencoded。使用@RequestParam注解来接收该参数。
example(可选):指定参数的示例值。required(可选):指定参数是否是必需的,默认为false。defaultValue(可选):指定参数的默认值。
5.4 @ApiModel 和 @ApiModelProperty 描述数据模型和属性
1
2
3
4
5
6
7
8
9
10
11
12
13
| @Data
@NoArgsConstructor
@AllArgsConstructor
@ApiModel(value = "ResultVo对象",description = "封装接口返回给前端的数据")
public class ResultVo {
@ApiModelProperty(value = "响应状态码",dataType = "int")
private int code;
@ApiModelProperty(value = "提示信息")
private String msg;
@ApiModelProperty(value = "响应数据")
private Object data;
}
|
1
2
3
4
5
6
7
8
9
10
11
12
13
14
15
16
| @Data
@NoArgsConstructor
@AllArgsConstructor
@ApiModel(value = "User对象",description = "用户信息")
public class User {
@ApiModelProperty(value = "用户ID",dataType = "int",required = false)
private int userId;
@ApiModelProperty(value = "用户姓名",dataType = "string",required = true)
private String userName;
@ApiModelProperty(value = "用户密码",dataType = "string",required = true)
private String userPwd;
@ApiModelProperty(value = "用户真实姓名",dataType = "string",required = true)
private String userRealname;
@ApiModelProperty(value = "用户头像url",dataType = "string",required = true)
private String userImg;
}
|
1
2
3
4
5
6
7
8
| @ApiModel(description = "性别")
public enum Gender {
@ApiModelProperty(value = "男")
MALE,
@ApiModelProperty(value = "女")
FEMALE;
}
|
5.5 @ApiIgnore 接口方法注解,添加此注解的方法将不会生成到接口文档中
Referenct

