1.组件编码流程
组件化编码流程:
- 拆分静态组件:组件要按照功能点拆分,命名不要与html元素冲突。
- 实现动态组件:考虑好数据的存放位置,数据是一个组件在用,还是一些组件在用:
- 一个组件在用:放在组件自身即可。
- 一些组件在用:放在他们共同的父组件上(状态提升)。
- 实现交互:从绑定事件开始。
props 适用于:
- 父组件 ==> 子组件 通信
- 子组件 ==> 父组件 通信(要求父先给子一个函数)
使用 v-model 时要切记:v-model 绑定的值不能是 props传过来的值,因为 props 是不可以修改的!
props 传过来的若是对象类型的值,修改对象中的属性时Vue不会报错,但不推荐这样做。
2.组件自定义事件
组件自定义事件是一种组件间通信的方式,适用于:子组件 ===> 父组件
使用场景
A是父组件,B是子组件,B想给A传数据,那么就要在A中给B绑定自定义事件(事件的回调在A中)。
2.1绑定自定义事件
第一种方式,在父组件中:<Demo @atguigu="test"/> 或 <Demo v-on:atguigu="test"/>
具体代码
App.vue
1
2
3
4
5
6
7
8
9
10
11
12
13
14
15
16
17
18
19
20
21
22
23
24
25
26
27
28
29
30
31
32
33
34
| <template>
<div class="app">
<!-- 通过父组件给子组件绑定一个自定义事件实现:子给父传递数据(第一种写法,使用@或v-on) -->
<Student @atguigu="getStudentName"/>
</div>
</template>
<script>
import Student from './components/Student'
export default {
name:'App',
components:{Student},
data() {
return {
msg:'你好啊!',
studentName:''
}
},
methods: {
getStudentName(name,...params){
console.log('App收到了学生名:',name,params)
this.studentName = name
}
}
}
</script>
<style scoped>
.app{
background-color: gray;
padding: 5px;
}
</style>
|
Student.vue
1
2
3
4
5
6
7
8
9
10
11
12
13
14
15
16
17
18
19
20
21
22
23
24
25
26
27
28
29
30
| <template>
<div class="student">
<button @click="sendStudentlName">把学生名给App</button>
</div>
</template>
<script>
export default {
name:'Student',
data() {
return {
name:'张三',
}
},
methods: {
sendStudentlName(){
//触发Student组件实例身上的atguigu事件
this.$emit('atguigu',this.name,666,888,900)
}
},
}
</script>
<style lang="less" scoped>
.student{
background-color: pink;
padding: 5px;
margin-top: 30px;
}
</style>
|
第二种方式,在父组件中:使用 this.$refs.xxx.$on() 这样写起来更灵活,比如可以加定时器啥的。
具体代码如下
App.vue
1
2
3
4
5
6
7
8
9
10
11
12
13
14
15
16
17
18
19
20
21
22
23
24
25
26
27
28
29
30
31
32
33
34
35
36
37
| <template>
<div class="app">
<!-- 通过父组件给子组件绑定一个自定义事件实现:子给父传递数据(第二种写法,使用ref) -->
<Student ref="student"/>
</div>
</template>
<script>
import Student from './components/Student'
export default {
name:'App',
components:{Student},
data() {
return {
studentName:''
}
},
methods: {
getStudentName(name,...params){
console.log('App收到了学生名:',name,params)
this.studentName = name
},
},
mounted() {
this.$refs.student.$on('atguigu',this.getStudentName) //绑定自定义事件
// this.$refs.student.$once('atguigu',this.getStudentName) //绑定自定义事件(一次性)
},
}
</script>
<style scoped>
.app{
background-color: gray;
padding: 5px;
}
</style>
|
Student.vue
1
2
3
4
5
6
7
8
9
10
11
12
13
14
15
16
17
18
19
20
21
22
23
24
25
26
27
28
29
30
| <template>
<div class="student">
<button @click="sendStudentlName">把学生名给App</button>
</div>
</template>
<script>
export default {
name:'Student',
data() {
return {
name:'张三',
}
},
methods: {
sendStudentlName(){
//触发Student组件实例身上的atguigu事件
this.$emit('atguigu',this.name,666,888,900)
}
},
}
</script>
<style lang="less" scoped>
.student{
background-color: pink;
padding: 5px;
margin-top: 30px;
}
</style>
|
若想让自定义事件只能触发一次,可以使用 once 修饰符,或 $once 方法。
触发自定义事件:this.$emit('事件名',数据)
使用 this.$emit() 就可以子组件向父组件传数据
注意:通过 this.$refs.xxx.$on('atguigu',回调) 绑定自定义事件时,回调 要么配置在methods中,要么用箭头函数,否则this指向会出问题!
2.2 解绑自定义事件 this.$off('事件名')
代码
2.3 组件使用原生事件
组件上也可以绑定原生DOM事件,需要使用 native 修饰符。 如果不用 .native 修饰符就会被当成自定义事件
1
2
| <!-- 通过父组件给子组件绑定一个自定义事件实现:子给父传递数据(第二种写法,使用ref) -->
<Event1 @click.native="handler1"></Event1>
|
- 原生DOM—button可以绑定系统事件—-click单击事件等等
- 组件标签— event1可以绑定系统事件(不起作用,因为属于自定义事件)—-native(可以把自定义事件变为原生DOM事件)
利用 native 触发—原理是事件委派
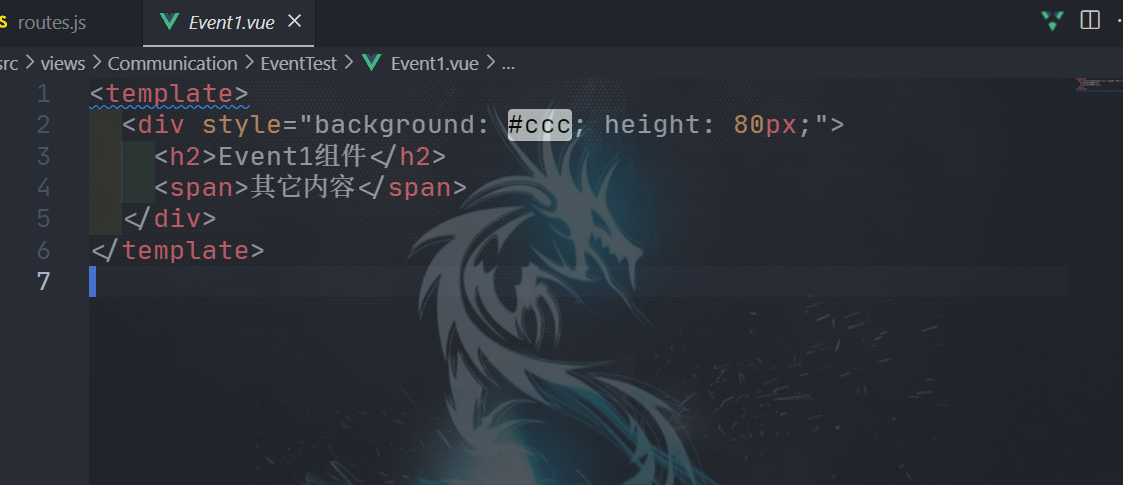
在views/Communication/EventTest/Event1.vue中:
他的结构是这样的,但是我们在页面中,不管是点击 Event1 组件,还是其他内容,都可以触发打印,那是因为当前原生DOMclick事件,其实是给子组件的根节点div绑定了点击事件—-利用事件委派,所以里面的h2和span也是可以触发打印的
注意:给原生DOM绑定自定义事件没有任何意义的,因为没有办法触发 $emit 函数
一般是给组件绑定自定义事件在结合 $on,$emit 使用
2.4 自定义组件中的$event
一般子组件传给父组件的值在 methods 对象中的函数接收,然而有时想从当前组件传些数据,但是这样就无法接收子组件传来的数据了
这时可以使用 $event
1
2
3
4
5
6
7
8
9
10
11
12
13
14
15
16
17
18
19
20
21
22
23
24
25
26
27
| // 子组件 传值
export default {
methods: {
customEvent() {
this.$emit(custom-event, value)
}
}
}
// 父组件 接收自定义事件
<template>
<div>
<my-item v-for="(item, index) in list" @custom-event="customEvent(index, $event)">
<my-list/>
</my-item>
</div>
</template>
// 接收$event
export default {
methods: {
//e就是接收过来的$event 现在他就是子组件传过来的值 不再是 对象事件
customEvent(index, e) {
console.log(e) // some value
}
}
}
|
3.全局事件总线
一种可以在任意组件间通信的方式,本质上就是一个对象,它必须满足以下条件
- 所有的组件对象都必须能看见他
- 这个对象必须能够使用
$on$emit$off 方法去绑定、触发和解绑事件
使用步骤
安装全局事件总线或者叫定义全局事件总线:
1
2
3
4
5
6
7
| new Vue({
......
beforeCreate() {
Vue.prototype.$bus = this //安装全局事件总线,$bus就是当前应用的vm
},
......
})
|
使用事件总线:
接收数据:A组件想接收数据,则在A组件中给$bus绑定自定义事件,事件的 回调留在A组件自身。
1
2
3
4
5
6
7
| methods(){
demo(data){......}
}
......
mounted() {
this.$bus.$on('xxxx',this.demo)
}
|
提供数据:this.$bus.$emit('xxxx',数据)
最好在beforeDestroy钩子中,用 $off 去解绑当前组件所用到的事件。
因为销毁的时候只会把组件销毁,不会把$bus上的销毁,下车要把东西带走。