29-Vue-Router 路由

1.相关理解

1.1 vue-router 的理解

vue的一个插件库,专门用来实现 SPA(单页面应用) 应用

1.2 对SPA应用的理解

  1. 单页Web应用(single page web application,SPA)
  2. 整个应用只有一个完整的页面
  3. 点击页面中的导航链接不会刷新页面,只会做页面的局部更新
  4. 数据需要通过ajax请求获取

1.3 路由的理解

  1. 什么是路由?
    一个路由就是一组映射关系(key - value)
    key路径value可能是functioncomponent

  2. 路由分类

    • 后端路由
      理解:value是function,用于处理客户端提交的请求
      工作过程:服务器接收到一个请求时,根据请求路径找到匹配的函数来处理请求,返回响应数据

    • 前端路由
      理解:value是component,用于展示页面内容
      工作过程:当浏览器的路径改变时,对应的组件就会显示

      ① 用户点击了页面上的路由链接(本质是a链接)

      ② 导致了 URL 地址栏中的 Hash 值发生了变化

      ③ 前端路由监听了到 Hash 地址的变化

      ④ 前端路由把当前 Hash 地址对应的组件渲染都浏览器中

image-20220704114254454

结论:前端路由,指的是 Hash 地址与组件之间的对应关系!

2.基本路由

2.1基本使用

  1. 安装vue-router,命令:npm i vue-router@3

  2. 应用插件:Vue.use(VueRouter)

  3. 编写router配置项:

    1
    2
    3
    4
    5
    6
    7
    8
    9
    10
    11
    12
    13
    14
    15
    16
    17
    18
    19
    20
    21
    22
    //引入VueRouter
    import VueRouter from 'vue-router'
    //引入Luyou 组件
    import About from '../components/About'
    import Home from '../components/Home'

    //创建router实例对象,去管理一组一组的路由规则
    const router = new VueRouter({
    routes:[
    {
    path:'/about',
    component:About
    },
    {
    path:'/home',
    component:Home
    }
    ]
    })

    //暴露router
    export default router
  4. 实现切换
    <router-link></router-link> 浏览器会被替换为a标签
    active-class 设置 链接激活时使用的 CSS 类名

    1
    <router-link active-class="active" to="/about">About</router-link>
  5. 指定展示位置

    1
    <router-view></router-view>

切换的时候会把路由销毁,触发销毁生命周期函数

2.2实际使用

src/router/index.js 该文件专门用于创建整个应用的路由器

1
2
3
4
5
6
7
8
9
10
11
12
13
14
15
16
17
18
import VueRouter from 'vue-router'
// 引入组件
import About from '../components/About'
import Home from '../components/Home'

// 创建并暴露一个路由器
export default new VueRouter({
routes:[
{
path:'/about',
component:About
},
{
path:'/home',
component:Home
}
]
})

src/main.js

1
2
3
4
5
6
7
8
9
10
11
12
13
14
import Vue from 'vue'
import App from './App.vue'
import VueRouter from 'vue-router' // 引入VueRouter
import router from './router' // 引入路由器

Vue.config.productionTip = false

Vue.use(VueRouter) // 应用插件

new Vue({
el:'#app',
render: h => h(App),
router:router
})

src/App.vue

1
2
3
4
5
6
7
8
9
10
11
12
13
14
15
16
17
18
19
20
21
22
<template>
<div>
<!-- 原始html中我们使用a标签实现页面的跳转 -->
<!-- <a class="list-group-item active" href="./about.html">About</a> -->
<!-- <a class="list-group-item" href="./home.html">Home</a> -->

<!-- Vue中借助router-link标签实现路由的切换 -->
<router-link class="list-group-item"
active-class="active" to="/about">About</router-link>
<router-link class="list-group-item"
active-class="active" to="/home">Home</router-link>

<!-- 指定组件的呈现位置 -->
<router-view></router-view>
</div>
</template>

<script>
export default {
name:'App'
}
</script>

src/components/Home.vue

1
2
3
4
5
6
7
8
9
<template>
<h2>我是Home的内容</h2>
</template>

<script>
export default {
name:'Home'
}
</script>

src/components/About.vue

1
2
3
4
5
6
7
8
9
<template>
<h2>我是About的内容</h2>
</template>

<script>
export default {
name:'About'
}
</script>

image-20220703221721123

3.几个注意点

  1. 路由组件通常存放在 pages 文件夹,一般组件通常存放在 components 文件夹。
  2. 通过切换,“隐藏”了的路由组件,默认是被销毁掉的,需要的时候再去挂载。
  3. 每个组件都有自己的 $route(路由) 属性,里面存储着自己的路由信息。
  4. 整个应用只有一个router,可以通过组件的 $router(路由器) 属性获取到。

4.多级路由

  1. 配置路由规则,使用children配置项:

    1
    2
    3
    4
    5
    6
    7
    8
    9
    10
    11
    12
    13
    14
    15
    16
    17
    18
    19
    20
    routes:[
    {
    path:'/about',
    component:About,
    },
    {
    path:'/home',
    component:Home,
    children:[ //通过children配置子级路由
    {
    path:'news', //此处一定不要写:/news
    component:News
    },
    {
    path:'message',//此处一定不要写:/message
    component:Message
    }
    ]
    }
    ]
  2. 跳转(要写完整路径):

    1
    <router-link to="/home/news">News</router-link>
  3. 指定展示位置

    1
    <router-view></router-view>

    src/pages/Home.vue

    1
    2
    3
    4
    5
    6
    7
    8
    9
    10
    11
    12
    13
    14
    15
    16
    17
    18
    <template>
    <div>
    <h2>Home组件内容</h2>
    <div>
    <ul class="nav nav-tabs">
    <li><router-link class="list-group-item" active-class="active" to="/home/news">News</router-link></li>
    <li><router-link class="list-group-item" active-class="active" to="/home/message">Message</router-link></li>
    </ul>
    <router-view></router-view>
    </div>
    </div>
    </template>

    <script>
    export default {
    name:'Home',
    }
    </script>

    src/pages/Message.vue

    1
    2
    3
    4
    5
    6
    7
    8
    9
    10
    11
    12
    13
    14
    15
    16
    17
    18
    19
    <template>
    <ul>
    <li>
    <a href="/message1">message001</a>&nbsp;&nbsp;
    </li>
    <li>
    <a href="/message2">message002</a>&nbsp;&nbsp;
    </li>
    <li>
    <a href="/message/3">message003</a>&nbsp;&nbsp;
    </li>
    </ul>
    </template>

    <script>
    export default {
    name:'News'
    }
    </script>

    src/router/index.js

    1
    2
    3
    4
    5
    6
    7
    8
    9
    10
    11
    12
    13
    14
    15
    16
    17
    18
    19
    20
    21
    22
    23
    24
    25
    26
    27
    28
    29
    30
    31
    //该文件专门用于创建整个应用的路由器
    import VueRouter from "vue-router";
    //引入组件
    import Home from '../pages/Home'
    import About from '../pages/About'
    import News from '../pages/News'
    import Message from '../pages/Message'

    //创建并暴露一个路由器
    export default new VueRouter({
    routes:[
    {
    path:'/about',
    component:About
    },
    {
    path:'/home',
    component:Home,
    children:[
    {
    path:'news',
    component:News
    },
    {
    path:'message',
    component:Message
    }
    ]
    }
    ]
    })
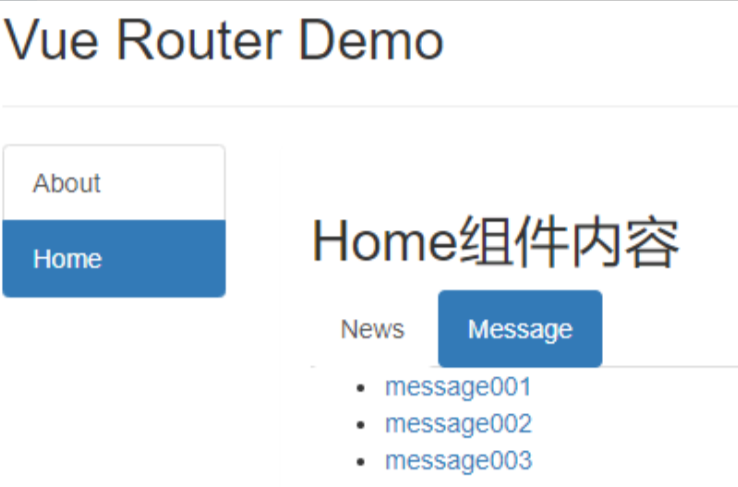
    image-20220703224025389

5.vue 中路由重定向 redirect

5.1 重定向到平级的路径上去

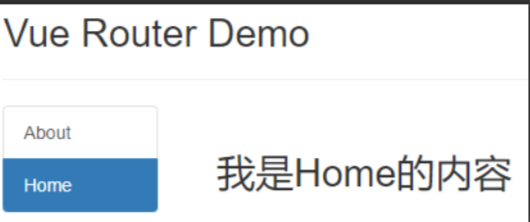
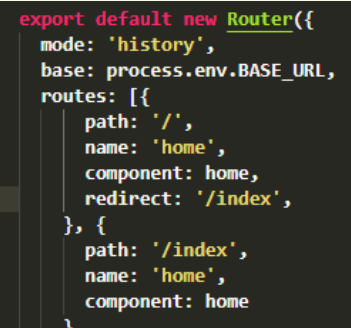
image-20220703224306857

第一个对象里是配置路由path:’/'为项目的根目录,redirect重定向为渲染的路径redirect:'/index'(这里我是指向了第二个对象里的path),所以就要写第二个对象方便 redirect 找到它。

重定向的地址不需要接收参数,把”/“重定向到”/index”

5.2 重定向到子路由路径上面去
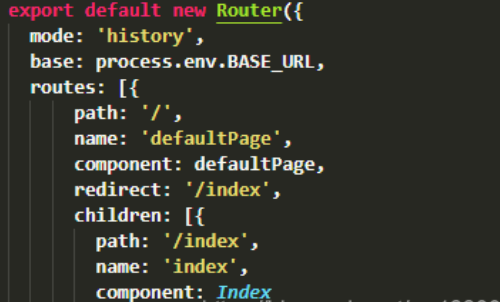
image-20220703225810368

父路由(path:’/‘)重定向到相应的子路由路径上去了 redirect:'/index'

6.命名路由

  1. 作用:可以简化路由的跳转。

  2. 如何使用

    1. 给路由命名:

      1
      2
      3
      4
      5
      6
      7
      8
      9
      10
      11
      12
      13
      14
      15
      16
      17
      {
      path:'/demo',
      component:Demo,
      children:[
      {
      path:'test',
      component:Test,
      children:[
      {
      name:'hello' //给路由命名
      path:'welcome',
      component:Hello,
      }
      ]
      }
      ]
      }
    2. 简化跳转:

      1
      2
      3
      4
      5
      6
      7
      8
      9
      10
      11
      12
      13
      14
      15
      16
      <!--简化前,需要写完整的路径 -->
      <router-link to="/demo/test/welcome">跳转</router-link>

      <!--简化后,直接通过名字跳转 -->
      <router-link :to="{name:'hello'}">跳转</router-link>

      <!--简化写法配合传递参数 -->
      <router-link
      :to="{
      name:'hello',
      query:{
      id:666,
      title:'你好'
      }
      }"
      >跳转</router-link>

7.路由的 query 参数

  1. 传递参数

    1
    2
    3
    4
    5
    6
    7
    8
    9
    10
    11
    12
    13
    <!-- 跳转并携带query参数,to的字符串写法 (先转成js表达式,然后使用模版字符串)-->
    <router-link :to="`/home/message/detail?id=666&title=你好`">跳转</router-link>

    <!-- 跳转并携带query参数,to的对象写法 -->
    <router-link
    :to="{
    path:'/home/message/detail',
    query:{
    id:666,
    title:'你好'
    }
    }"
    >跳转</router-link>
  2. 接收参数:

    1
    2
    $route.query.id
    $route.query.title

image-20220703230618683

8.路由的params参数

8.1 基本使用

  1. 配置路由,声明接收params参数

    1
    2
    3
    4
    5
    6
    7
    8
    9
    10
    11
    12
    13
    14
    15
    16
    17
    18
    19
    20
    {
    path:'/home',
    component:Home,
    children:[
    {
    path:'news',
    component:News
    },
    {
    component:Message,
    children:[
    {
    name:'xiangqing',
    path:'detail/:id/:title', //使用占位符声明接收params参数
    component:Detail
    }
    ]
    }
    ]
    }
  2. 传递参数

    1
    2
    3
    4
    5
    6
    7
    8
    9
    10
    11
    12
    13
    <!-- 跳转并携带params参数,to的字符串写法 -->
    <router-link :to="/home/message/detail/666/你好">跳转</router-link>

    <!-- 跳转并携带params参数,to的对象写法 -->
    <router-link
    :to="{
    name:'xiangqing', // 不能使用path配置项,必须使用name配置
    params:{
    id:666,
    title:'你好'
    }
    }"
    >跳转</router-link>

    特别注意:路由携带params参数时,若使用to的对象写法,则不能使用path配置项,必须使用name配置!

  3. 接收参数:

    1
    2
    $route.params.id
    $route.params.title

8.2 params传参问题

(1)如何指定params参数可传可不传

如果路由path要求传递params参数,但是没有传递,会发现地址栏URL有问题,详情如下:

1
2
3
4
5
6
7
8
9
10
// Search路由项的path已经指定要传一个keyword的params参数,如下所示:
path: "/search/:keyword",

// 执行下面进行路由跳转的代码:
this.$router.push({name:"Search",query:{keyword:this.keyword}})

// 当前跳转代码没有传递params参数
// 地址栏信息:http://localhost:8080/#/?keyword=asd
// 此时的地址信息少了/search
// 正常的地址栏信息: http://localhost:8080/#/search?keyword=asd

解决方法

可以通过改变path来指定params参数可传可不传: path: "/search/:keyword?",?表示该参数可传可不传

(2)由(1)可知params可传可不传,但是如果传递的是空串,如何解决。

1
2
this.$router.push({name:"Search",query:{keyword:this.keyword},params:{keyword:''}})
// 出现的问题和1中的问题相同,地址信息少了/search

解决方法

加入 ||undefined,当我们传递的参数为空串时地址栏url也可以保持正常

this.$router.push({name:"Search",params:{keyword:this.keyword||undefined}})

9.路由的props配置

作用:让路由组件更方便的收到参数

1
2
3
4
5
6
7
8
9
10
11
12
13
14
15
16
17
18
19
20
{
name:'xiangqing',
path:'detail/:id',
component:Detail,

//第一种写法:props值为对象,该对象中所有的key-value的组合最终都会通过props传给Detail组件
// props:{a:900}

//第二种写法:props值为布尔值,布尔值为true,则把路由收到的所有params参数通过props传给Detail组件
// props:true

//第三种写法:props值为函数,该函数返回的对象中每一组key-value都会通过props传给Detail组件
props({query:{id,title}}){
return {
id:param.id
title:param.title
// id,title // 使用解构赋值法
},
}
}

src/pages/Detail.vue

1
2
3
4
5
6
7
8
9
10
11
12
13
<template>
<ul>
<li>消息编号:{{ id }}</li>
<li>消息标题:{{ title }}</li>
</ul>
</template>

<script>
export default {
name:'Detail',
props:['id','title']
}
</script>

10.replace

  1. 作用:控制路由跳转时操作浏览器历史记录的模式
  2. 浏览器的历史记录有两种写入方式:分别为 pushreplacepush 是追加历史记录,replace 是替换当前记录。路由跳转时候默认为 push
  3. 如何开启 replace 模式:<router-link replace .......>News</router-link>
    总结:浏览记录本质是一个栈,默认push,点开新页面就会在栈顶追加一个地址,后退,栈顶指针向下移动,改为replace就是不追加,而将栈顶地址替换

src/pages/Home.vue

1
2
3
4
5
6
7
8
9
10
11
12
13
14
15
16
<template>
<div>
<h2>Home组件内容</h2>
<div>
<router-link replace class="list-group-item" active-class="active" to="/home/news">News</router-link>
<router-link replace class="list-group-item" active-class="active" to="/home/message">Message</router-link>
<router-view></router-view>
</div>
</div>
</template>

<script>
export default {
name:'Home'
}
</script>

11.编程式路由导航

11.1 基本使用

作用:不借助<router-link>实现路由跳转,让路由跳转更加灵活

  • this.$router.push({}):内传的对象与<router-link>中的to相同,跳转到指定 hash 地址,并增加一条历史记录
  • this.$router.replace({}):跳转到指定的 hash 地址,并替换掉当前的历史记录
  • this.$router.forward():前进
  • this.$router.back();后退
  • this.$router.go(n):可前进也可后退,n为正数前进n,为负数后退

src/pages/Message.vue

1
2
3
4
5
6
7
8
9
10
11
12
13
14
15
16
17
18
19
20
21
22
23
24
25
26
27
28
29
30
31
32
33
34
35
36
37
38
39
40
41
42
43
44
45
46
47
<template>
<div>
<ul>
<li v-for="m in messageList" :key="m.id">
<button @click="showPush(m)">push查看</button>
<button @click="showReplace(m)">replace查看</button>
</li>
</ul>
<hr/>
<router-view></router-view>
</div>
</template>

<script>
export default {
name:'News',
data(){
return{
messageList:[
{id:'001',title:'消息001'},
{id:'002',title:'消息002'},
{id:'003',title:'消息003'}
]
}
},
methods:{
showPush(m){
this.$router.push({
name:'xiangqing',
query:{
id:m.id,
title:m.title
}
})
},
showReplace(m){
this.$router.replace({
name:'xiangqing',
query:{
id:m.id,
title:m.title
}
})
}
}
}
</script>

src/components/Banner.vue

1
2
3
4
5
6
7
8
9
10
11
12
13
14
15
16
17
18
19
20
21
22
23
24
25
26
27
<template>
<div class="col-xs-offset-2 col-xs-8">
<div class="page-header">
<h2>Vue Router Demo</h2>
<button @click="back">后退</button>
<button @click="forward">前进</button>
<button @click="test">测试一下go</button>
</div>
</div>
</template>

<script>
export default {
name:'Banner',
methods:{
back(){
this.$router.back()
},
forward(){
this.$router.forward()
},
test(){
this.$router.go(3)
}
},
}
</script>

简化写法

1
2
<button @click="$router.forward">前进</button>
<button @click="$router.back">后退</button>

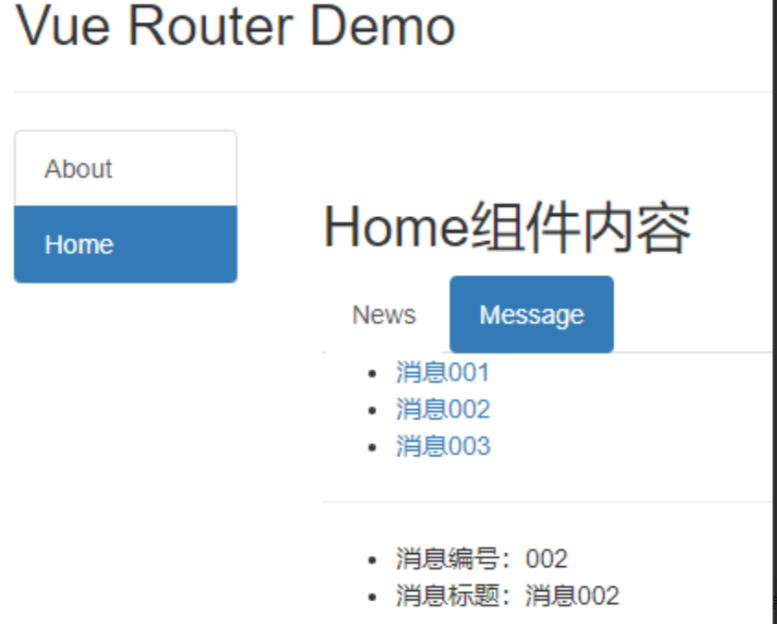
image-20220703231510181

11.2 多次执行相同的push问题

多次执行相同的push问题,控制台会出现警告

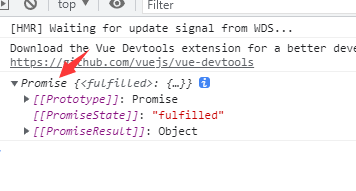
例如:使用 this.$router.push({name:'Search',params:{keyword:".."||undefined}}) 时,如果多次执行相同的push,控制台会出现警告。

1
2
let result = this.$router.push({name:"Search",query:{keyword:this.keyword}})
console.log(result)

执行一次上面代码:
在这里插入图片描述

多次执行出现警告:
在这里插入图片描述

原因:push是一个promise,promise需要传递成功和失败两个参数,我们的push中没有传递。

方法:this.$router.push({name:'Search',params:{keyword:".."||undefined}},()=>{},()=>{})后面两项分别代表执行成功和失败的回调函数。

这种写法治标不治本,将来在别的组件中push|replace,编程式导航还是会有类似错误

push 是 VueRouter.prototype 的一个方法,在 router 中的 index 重写该方法即可(看不懂也没关系,这是前端面试题)

1
2
3
4
5
6
7
8
9
10
11
12
//1、先把VueRouter原型对象的push,保存一份
let originPush = VueRouter.prototype.push;
//2、重写push|replace
//第一个参数:告诉原来的push,跳转的目标位置和传递了哪些参数
VueRouter.prototype.push = function (location,resolve,reject){
if(resolve && reject){
//因为函数是被window调用,这里函数内部的this得是vuerouter实例
originPush.call(this,location,resolve,reject)
}else{
originPush.call(this,location,() => {},() => {})
}
}

12.缓存路由组件

  1. 作用:让不展示的路由组件保持挂载,不被销毁。

  2. 具体编码:

    这个 include 指的是组件名

    1
    2
    3
    4
    5
    6
    7
    8
    9
    // 缓存一个路由组件
    <keep-alive include="News"> // include中写想要缓存的组件名,不写表示全部缓存
    <router-view></router-view>
    </keep-alive>

    // 缓存多个路由组件
    <keep-alive :include="['News','Message']">
    <router-view></router-view>
    </keep-alive>

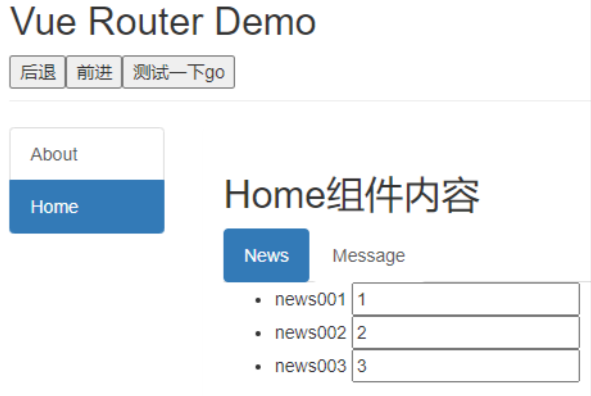
src/pages/News.vue

1
2
3
4
5
6
7
8
9
10
11
12
13
<template>
<ul>
<li>news001 <input type="text"></li>
<li>news002 <input type="text"></li>
<li>news003 <input type="text"></li>
</ul>
</template>

<script>
export default {
name:'News'
}
</script>

image-20220703231818463

切换完回来不会清除已输入的内容

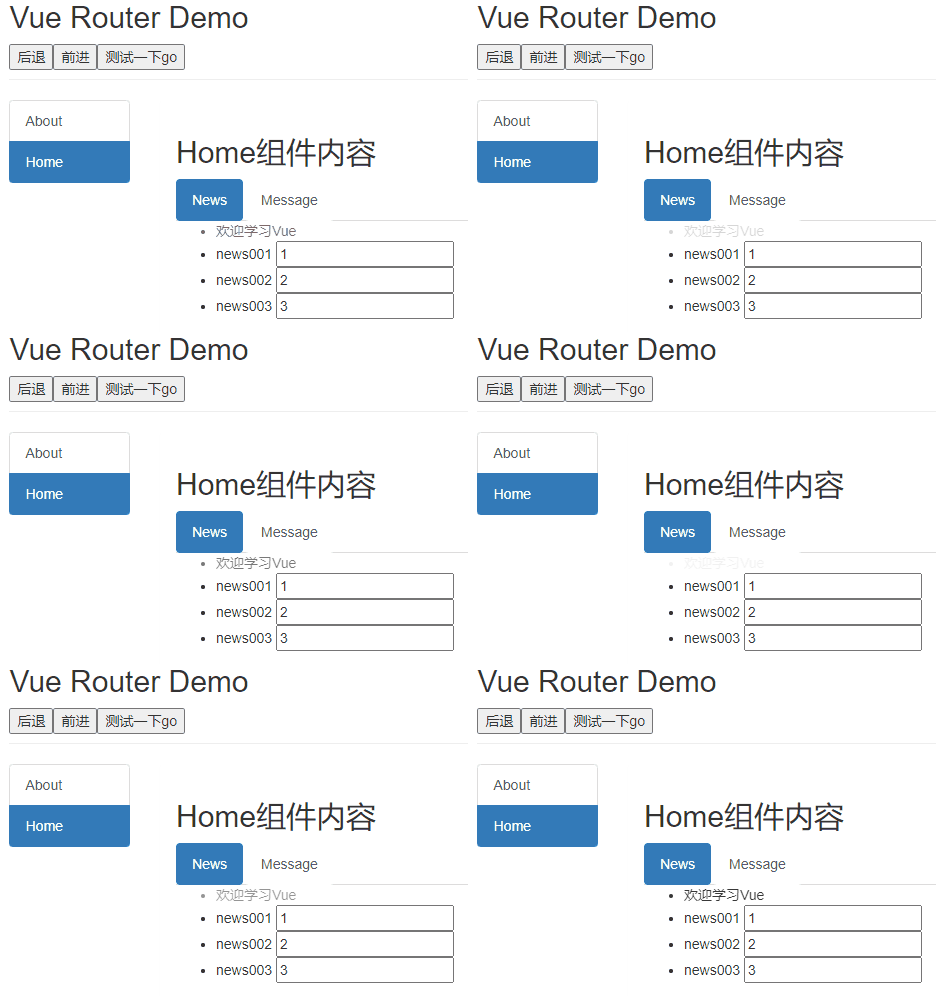
13.两个新的生命周期钩子

  1. 作用:路由组件所独有的两个钩子,用于捕获路由组件的激活状态。
  2. 具体名字:
    1. activated路由组件被激活时触发。
    2. deactivated路由组件失活时触发。

因为这个路由使用keep-alive,所以切换不会清除定时器

src/pages/News.vue

1
2
3
4
5
6
7
8
9
10
11
12
13
14
15
16
17
18
19
20
21
22
23
24
25
26
27
28
29
30
31
<template>
<ul>
<li :style="{opacity}">欢迎学习vue</li>
<li>news001 <input type="text"></li>
<li>news002 <input type="text"></li>
<li>news003 <input type="text"></li>
</ul>
</template>

<script>
export default {
name:'News',
data(){
return{
opacity:1
}
},

activated(){
console.log('News组件被激活了')
this.timer = setInterval(() => {
this.opacity -= 0.01
if(this.opacity <= 0) this.opacity = 1
},16)
},
deactivated(){
console.log('News组件失活了')
clearInterval(this.timer)
}
}
</script>

手风琴动画.gif

14.路由守卫

  1. 作用:对路由进行权限控制
  2. 分类:全局守卫、独享守卫、组件内守卫

路由守卫总共有7个

全局路由守卫:

  • beforeEach 前置守卫
  • affterEach 后置守卫
  • beforeResolve 解析守卫

路由的守卫

  • beforeRouterEnter 进入组件之前触发,在Created前面
  • beforeRouterUpdated 路由更新但是内容不会改变
  • beforeRouterLeave 离开之前触发,在beforeDestory之前触发

路由独享守卫

  • beforeEnter 读取路由的信息

14.1 全局路由守卫

每次发生路由的导航跳转时,都会触发全局前置守卫。因此,在全局前置守卫中,程序员可以对每个路由进行访问权限的控制:

你可以使用 router.beforeEach 注册一个全局前置守卫:

1
2
3
4
5
6
7
8
9
10
11
12
13
//创建路由的实例对象
const router = new VueRouter({...})

//为router实例对象,声明全局前置导航守卫
//只要发生了路由的跳转,必然会触发beforeEach指定的function回调函数
router.beforeEach((to, from, next)=>{
//to是将要访问的路由的信息对象
//from是将要离开的路由的信息对象
//next是一个函数,调用next()表示放行,允许这次路由导航
next(); //next函数表示放行的意思
})

export default router

每个守卫方法接收三个参数:

  • to: Route: 即将要进入的目标路由对象
  • from: Route: 当前导航正要离开的路由
  • next: Function: 钩子函数,里面定义参数,确认下一步路由要做什么

next('/') 或者 next({ path: '/'}): 跳转到一个不同的地址。当前的导航被中断,然后进行一个新的导航。你可以向 next 传递任意位置对象,next({name: 'home'})

next 函数的 3 种调用方式

image-20220704114657579

  • 当前用户拥有后台主页的访问权限,直接放行:next()
  • 当前用户没有后台主页的访问权限,强制其跳转到登录页面:next('/login')
  • 当前用户没有后台主页的访问权限,不允许跳转到后台主页:next(false)

一般应用在用户未能验证身份时重定向到 /login :

1
2
3
4
router.beforeEach((to, from, next) => {
if (to.name !== 'Login' && !isAuthenticated) next({ name: 'Login' })
else next()
})

1
2
3
4
5
6
7
8
9
10
11
12
13
14
15
16
17
18
19
20
21
22
23
24
25
26
27
28
29
30
31
32
33
34
35
36
37
38
39
40
41
42
43
44
45
46
47
48
49
50
51
52
53
54
55
56
57
58
59
60
61
62
63
64
65
66
67
68
69
70
71
72
73
74
75
76
77
78
//该文件专门用于创建整个应用的路由器
import VueRouter from "vue-router";
//引入组件
import Home from '../pages/Home'
import About from '../pages/About'
import News from '../pages/News'
import Message from '../pages/Message'
import Detail from '../pages/Detail'


//创建一个路由器
const router = new VueRouter({
routes:[
{
name:'guanyv',
path:'/about',
component:About,
meta:{title:'关于'}
},
{
name:'zhuye',
path:'/home',
component:Home,
meta:{title:'主页'},
children:[
{
name:'xinwen',
path:'news',
component:News,
meta:{isAuth:true,title:'新闻'}
},
{
name:'xiaoxi',
path:'message',
component:Message,
meta:{isAuth:true,title:'消息'},
children:[
{
name:'xiangqing',
path:'detail',
component:Detail,
meta:{isAuth:true,title:'详情'},
props($route){
return {
id:$route.query.id,
title:$route.query.title,
}
}
}
]
}
]
}
]
})

// 全局前置路由守卫————初始化的时候、每次路由切换之前被调用
router.beforeEach((to,from,next) => {
console.log('前置路由守卫',to,from)
if(to.meta.isAuth){
if(localStorage.getItem('school')==='atguigu'){
next()
}else{
alert('学校名不对,无权限查看!')
}
}else{
next()
}
})

// 全局后置路由守卫————初始化的时候被调用、每次路由切换之后被调用
router.afterEach((to,from)=>{
console.log('后置路由守卫',to,from)
document.title = to.meta.title || '硅谷系统'
})

// 导出路由器
export default router

14.2 独享路由守卫

你可以在路由配置上直接定义 beforeEnter 守卫:

1
2
3
4
5
6
7
8
9
10
11
const router = new VueRouter({
routes: [
{
path: '/foo',
component: Foo,
beforeEnter: (to, from, next) => {
// ...
}
}
]
})

这些守卫与全局前置守卫的方法参数是一样的。

1
2
3
4
5
6
7
8
9
10
11
12
13
14
15
16
17
18
19
20
21
22
23
24
25
26
27
28
29
30
31
32
33
34
35
36
37
38
39
40
41
42
43
44
45
46
//该文件专门用于创建整个应用的路由器
import VueRouter from "vue-router";
//引入组件

//创建一个路由器
const router = new VueRouter({
routes:[
{
name:'zhuye',
path:'/home',
component:Home,
meta:{title:'主页'},
children:[
{
name:'xinwen',
path:'news',
component:News,
meta:{title:'新闻'},
// 独享守卫,特定路由切换之后被调用
beforeEnter(to,from,next){
console.log('beforeEnter',to,from)
if(to.meta.isAuth){ //判断当前路由是否需要进行权限控制
if(localStorage.getItem('school') === 'atguigu'){
next()
}else{
alert('暂无权限查看')
// next({name:'guanyu'})
}
}else{
next()
}
}
},
]
}
]
})

//全局后置路由守卫————初始化的时候被调用、每次路由切换之后被调用
router.afterEach((to,from)=>{
console.log('后置路由守卫',to,from)
document.title = to.meta.title || '硅谷系统'
})

//导出路由器
export default router

14.3 组件内路由守卫

可以在路由组件内直接定义以下路由导航守卫:

进组组件前的守卫 beforeRouteEnter
路由更新时的守卫 beforeRouteUpdate (2.2 新增)
离开组件时的守卫 beforeRouteLeave

1
2
3
4
5
6
7
8
9
10
11
12
13
14
15
beforeRouteEnter(to, from, next) {
// 在渲染该组件的对应路由被 confirm 前调用
// 不!能!获取组件实例 this
// 因为当守卫执行前,组件实例还没被创建
},
beforeRouteUpdate(to, from, next) {
// 在当前路由改变,但是该组件被复用时调用
// 举例来说,对于一个带有动态参数的路径 /foo/:id,在 /foo/1 和 /foo/2 之间跳转的时候,
// 由于会渲染同样的 Foo 组件,因此组件实例会被复用。而这个钩子就会在这个情况下被调用。
// 可以访问组件实例 this
},
beforeRouteLeave(to, from, next) {
// 导航离开该组件的对应路由时调用
// 可以访问组件实例 this
}

beforeRouteEnter 守卫不能访问 this,因为守卫在导航确认前被调用,因此即将登场的新组件还没被创建。

不过,你可以通过传一个回调给 next 来访问组件实例。在导航被确认的时候执行回调,并且把组件实例作为回调方法的参数。

1
2
3
4
5
6
beforeRouteEnter (to, from, next) {
next(vc => {
vc.$store.state.token
// 通过 `vc` 访问组件实例
})
}

注意 beforeRouteEnter 是支持给 next 传递回调的唯一守卫。对于 beforeRouteUpdate 和 beforeRouteLeave 来说,this 已经可用了,所以不支持传递回调,因为没有必要了。

1
2
3
4
beforeRouteUpdate (to, from, next) {
this.name = to.params.name
next()
}

这个离开守卫通常用来禁止用户在还未保存修改前突然离开。该导航可以通过 next(false) 来取消。

1
2
3
4
5
6
7
8
beforeRouteLeave (to, from, next) {
const answer = window.confirm('你真的要离开吗?你还没有保存!')
if (answer) {
next()
} else {
next(false)
}
}

14.4 总结

完整的导航解析流程:

  • 导航被触发。
  • 在失活的组件里调用beforeRouteLeave守卫。
  • 调用全局的 beforeEach 守卫。
  • 在重用的组件里调用beforeRouteUpdate守卫 (2.2+)。
  • 在路由配置里调用 beforeEnter
  • 解析异步路由组件。
  • 在被激活的组件里调用 beforeRouteEnter
  • 调用全局的 beforeResolve 守卫 (2.5+)。
  • 导航被确认。
  • 调用全局的 afterEach 钩子。
  • 触发 DOM 更新。
  • 调用 beforeRouteEnter 守卫中传给 next 的回调函数,创建好的组件实例会作为回调函数的参数传入。

15.路由懒加载

当打包构建应用时,JavaScript 包会变得非常大,影响页面加载。如果我们能把不同路由对应的组件分割成不同的代码块,然后当路由被访问的时候才加载对应组件,这样就更加高效了。

1
2
3
4
5
{
path: '/center',
component: () => import('@/views/Center'),
redirect: '/center/myOrder'
}

新的导入方式,这样导入在加载时只会按需加载

16.路由器的两种工作模式

  1. 对于一个url来说,什么是hash值?—— #及其后面的内容就是hash值。
  2. hash值不会包含在 HTTP 请求中,即:hash值不会带给服务器。
  3. hash模式:
    1. 地址中永远带着#号,不美观。
    2. 若以后将地址通过第三方手机app分享,若app校验严格,则地址会被标记为不合法。
    3. 兼容性较好。
  4. history模式:
    1. 地址干净,美观 。
    2. 兼容性和hash模式相比略差。
    3. 应用部署上线时需要后端人员支持,解决刷新页面服务端404的问题。

17.监听路由

复用组件时,想对路由参数的变化作出响应的话,你可以简单地 watch(监测变化) $route 对象:

最佳方法:我们每次进行新的搜索时,我们的 query 和 params 参数中的部分内容肯定会改变,而且这两个参数是路由的属性。我们可以通过监听路由信息的变化来动态发起搜索请求。

如下图所示,$route 是组件的属性,所以 watch 是可以监听的(watch可以监听组件data中所有的属性)

注意:组件中 data 的属性包括:自己定义的、系统自带的(如 $route)、父组件向子组件传递的等等

image-20220719125143578

1
2
3
4
5
6
7
8
9
10
11
12
13
watch:{
$route(newValue,oldValue){
// 对路由变化作出响应...
Object.assign(this.searchParams,this.$route.query,this.$route.params)
this.searchInfo()
//如果下一次搜索时只有params参数,拷贝后会发现searchParams会保留上一次的query参数
//所以每次请求结束后将相应参数制空
this.searchParams.category1Id = '';
this.searchParams.category2Id = '';
this.searchParams.category3Id = '';
this.$route.params.keyword = '';
}
},

18.滚动行为

使用前端路由,当切换到新路由时,想要页面滚到顶部,或者是保持原先的滚动位置,就像重新加载页面那样。 vue-router 能做到,而且更好,它让你可以自定义路由切换时页面如何滚动。

注意: 这个功能只在支持 history.pushState 的浏览器中可用。

当创建一个 Router 实例,你可以提供一个 scrollBehavior 方法:

1
2
3
4
5
6
7
8
9
10
const router = createRouter({
history: createWebHashHistory(),
routes: [...],
//设置滚动条的位置
scrollBehavior (to, from, savedPosition) {
//滚动行为这个函数,需要有返回值,返回值为一个对象。
//经常可以设置滚动条x|y位置 [x|y数值的设置一般最小是零]
return { top: 0 };
}
})

scrollBehavior 函数接收 to from 路由对象,如 Navigation Guards。第三个参数 savedPosition,只有当这是一个 popstate 导航时才可用(由浏览器的后退/前进按钮触发)。

https://router.vuejs.org/zh/guide/advanced/scroll-behavior.html


29-Vue-Router 路由
https://flepeng.github.io/021-frontend-04-Vue-01-course-29-Vue-Router-路由/
作者
Lepeng
发布于
2023年8月10日
许可协议