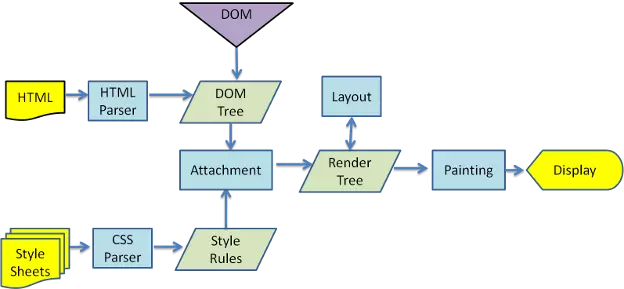
一、真实DOM和其解析流程 本节我们主要介绍真实 DOM 的解析过程,通过介绍其解析过程以及存在的问题,从而引出为什么需要虚拟 DOM。一图胜千言,如下图为 webkit 渲染引擎工作流程图
所有的浏览器渲染引擎工作流程大致分为5步:创建 DOM 树 —> 创建 Style Rules -> 构建 Render 树 —> 布局 Layout -—> 绘制 Painting。
第一步,构建 DOM 树:用 HTML 分析器,分析 HTML 元素,构建一棵 DOM 树;
第二步,生成样式表:用 CSS 分析器,分析 CSS 文件和元素上的 inline 样式,生成页面的样式表;
第三步,构建 Render 树:将 DOM 树和样式表关联起来,构建一棵 Render 树(Attachment)。每个 DOM 节点都有 attach 方法,接受样式信息,返回一个 render 对象(又名 renderer),这些 render 对象最终会被构建成一棵 Render 树;
第四步,确定节点坐标:根据 Render 树结构,为每个 Render 树上的节点确定一个在显示屏上出现的精确坐标;
第五步,绘制页面:根据 Render 树和节点显示坐标,然后调用每个节点的 paint 方法,将它们绘制出来。
注意点:
1、DOM 树的构建是文档加载完成开始的? 构建 DOM 树是一个渐进过程,为达到更好的用户体验,渲染引擎会尽快将内容显示在屏幕上,它不必等到整个 HTML 文档解析完成之后才开始构建 render 树和布局。
2、Render 树是 DOM 树和 CSS 样式表构建完毕后才开始构建的? 这三个过程在实际进行的时候并不是完全独立的,而是会有交叉,会一边加载,一边解析,以及一边渲染。
3、CSS 的解析注意点? CSS 的解析是从右往左逆向解析的,嵌套标签越多,解析越慢。
4、JS 操作真实 DOM 的代价? 用我们传统的开发模式,原生 JS 或 JQ 操作 DOM 时,浏览器会从构建 DOM 树开始从头到尾执行一遍流程。在一次操作中,我需要更新 10 个 DOM 节点,浏览器收到第一个 DOM 请求后并不知道还有 9 次更新操作,因此会马上执行流程,最终执行10 次。例如,第一次计算完,紧接着下一个 DOM 更新请求,这个节点的坐标值就变了,前一次计算为无用功。计算 DOM 节点坐标值等都是白白浪费的性能。即使计算机硬件一直在迭代更新,操作 DOM 的代价仍旧是昂贵的,频繁操作还是会出现页面卡顿,影响用户体验。
二、Virtual-DOM 基础 2.1、虚拟 DOM 的好处 虚拟 DOM 就是为了解决浏览器性能问题而被设计出来的。如前,若一次操作中有 10 次更新 DOM 的动作,虚拟 DOM 不会立即操作 DOM,而是将这 10 次更新的 diff 内容保存到本地一个 JS 对象中,最终将这个 JS 对象一次性 attch 到 DOM 树上,再进行后续操作,避免大量无谓的计算量。所以,用 JS 对象模拟 DOM 节点的好处是,页面的更新可以先全部反映在 JS 对象(虚拟 DOM )上,操作内存中的 JS 对象的速度显然要更快,等更新完成后,再将最终的 JS 对象映射成真实的 DOM,交由浏览器去绘制。
2.2、算法实现 2.2.1、用 JS 对象模拟 DOM 树 (1)如何用 JS 对象模拟 DOM 树
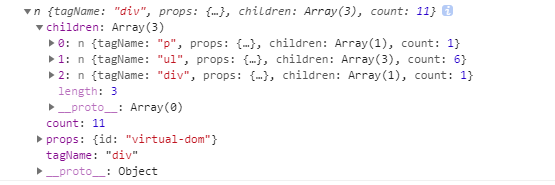
例如一个真实的 DOM 节点如下:
1 2 3 4 5 6 7 8 9 10 11 12 13 14 15 16 17 18 19 20 21 22 23 24 25 26 27 28 29 30 31 32 33 34 35 36 37 38 39 40 41 42 43 44 45 46 47 48 49 50 51 52 53 54 55 56 57 58 59 60 61 <div id ="virtual-dom" > <p > Virtual DOM</p > <ul id ="list" > <li class ="item" > Item 1</li > <li class ="item" > Item 2</li > <li class ="item" > Item 3</li > </ul > <div > Hello World</div > </div > <Element|String > } - 子节点
现在 ul 就是我们用 JavaScript 对象表示的 DOM 结构,我们输出查看 ul 对应的数据结构如下:
(2)渲染。用 JS 表示的 DOM 对象
但是页面上并没有这个结构,下一步我们介绍如何将 ul 渲染成页面上真实的 DOM 结构,相关渲染函数如下:
1 2 3 4 5 6 7 8 9 10 11 12 13 14 15 16 17 18 19 20 21 22 23 24 25 26 function (var el = document .createElement(this .tagName);var props = this .props;for (var propName in props) {var propValue = props[propName];var children = this .children || [];function (child ) var childEl = (child instanceof Element)document .createTextNode(child); return el`` ` 我们通过查看以上 ` render` 方法,会根据 ` tagName` 构建一个真正的 ` DOM` 节点,然后设置这个节点的属性,最后递归地把自己的子节点也构建起来。 我们将构建好的 ` DOM` 结构添加到页面 ` body` 上面,如下:
ulRoot = ul.render();
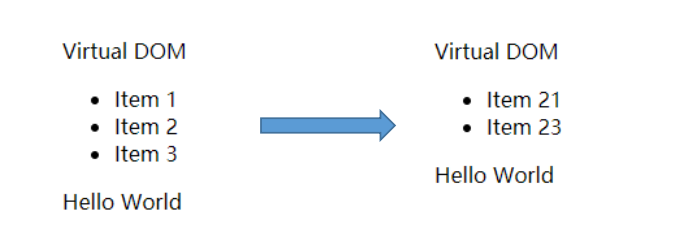
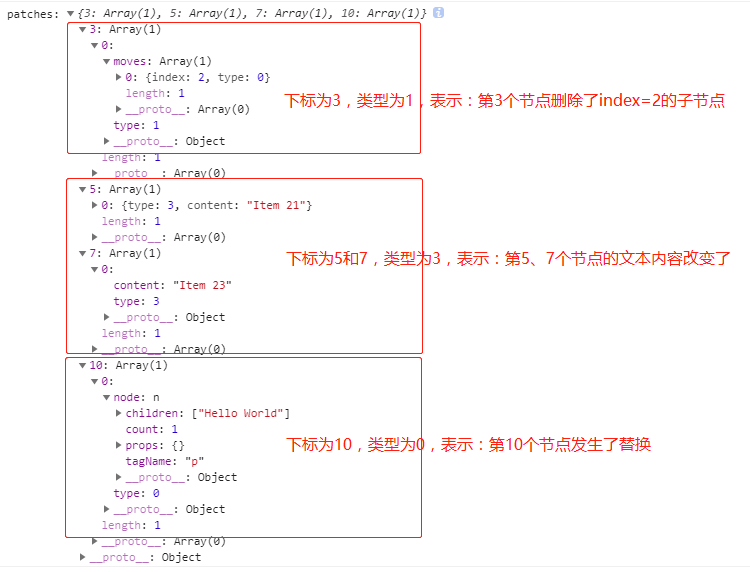
1 2 3 4 5 6 7 8 9 10 11 12 13 14 15 16 17 18 19 20 21 22 23 24 25 26 27 28 29 30 31 32 33 34 35 36 37 38 39 40 41 42 43 44 45 46 47 48 49 50 51 52 53 54 55 56 57 58 59 60 61 62 63 64 65 66 67 68 69 70 71 72 73 74 75 76 1721354665 -ae37ce7e337b55bdec386339279de967.png)2.2 .2 、比较两棵虚拟 `DOM` 树的差异 — `diff` 算法3 )`。但是在前端当中,你很少会跨越层级地移动 `DOM` 元素,所以 `Virtual DOM` 只会对同一个层级的元素进行对比,如下图所示,`div` 只会和同一层级的 `div` 对比,第二层级的只会跟第二层级对比,这样算法复杂度就可以达到 `O(n)`。1721354665 -cc1d829c044ce74ee47cfda92da2671b.png)1 )深度优先遍历,记录差异**1721354665 -05 d4546e61069071bc39a0bf663b665f.png)0 return patches"string" && typeof (newNode) === "string" ) { currentPatch.push({ type: patch.TEXT, content: newNode }) currentPatch.push({ type: patch.PROPS, props: propsPatches }) index, patches, currentPatch.push({ type: patch.REPLACE, node: newNode })1 ]` 表示 `p` ,`patches[3 ]` 表示 `ul` ,以此类推。2 )差异类型**
var REPLACE = 0 // 替换原先的节点
1 2 3 4 5 6 7 8 9 10 11 12 13 14 15 16 17 18 19 20 3 )列表对比算法**1965 年由苏联数学家 Vladimir Levenshtein 发明的。`Levenshtein Distance` 也被称为编辑距离(`Edit Distance`),通过**动态规划**求解,时间复杂度为 `O(M*N)`。1721354665 -12 faa0a4d098a69147134a31068d494f.png)1721354665 -9 ff9b22bb9423c0eeffaf3f4250ae085.png)本文的 `demo` 使用插件 `list-diff2` 算法进行比较,该算法的时间复杂度为 `O(n*m)`,虽然该算法并非最优的算法,但是用于对于 `dom` 元素的常规操作是足够的。该算法具体的实现过程这里不再详细介绍,该算法的具体介绍可以参照:[github.com/livoras/lis…](https: //link.juejin.cn/?target=https%3A% 2 F%2 Fgithub.com%2Flivoras% 2 Flist-diff "https://github.com/livoras/list-diff" )4 )实例输出**
var ul1 = el(‘div’,{id:’virtual-dom’},[
1 2 3 4 5 6 7 8 9 10 11 12 13 14 15 16 17 18 19 20 21 22 23 24 25 26 27 28 29 30 31 32 33 34 35 36 1721354665 -3 e8e1cb56aceea80c6731a910dbd1eff.png)2.2 .3 、将两个虚拟 `DOM` 对象的差异应用到真正的 `DOM` 树1 )深度优先遍历 `DOM` 树** var walker = {index: 0 } : 0 0
(2)对原有 DOM 树进行 DOM 操作
我们根据不同类型的差异对当前节点进行不同的 DOM 操作 ,例如如果进行了节点替换,就进行节点替换 DOM 操作;如果节点文本发生了改变,则进行文本替换的 DOM 操作;以及子节点重排、属性改变等 DOM 操作,相关代码如 applyPatches 所示:
1
2
3
4
5
6
7
8
9
10
11
12
13
14
15
16
17
18
19
20
21
22
23
function applyPatches (node, currentPatches ) currentPatch =>switch (currentPatch.type) {case REPLACE:var newNode = (typeof currentPatch.node === 'string' )document .createTextNode(currentPatch.node)break ;case REORDER:break ;case PROPS:break ;case TEXT:break ;default :throw new Error ('Unknown patch type ' + currentPatch.type)
(3)DOM 结构改变
通过将第 2.2.2 得到的两个 DOM 对象之间的差异,应用到第一个(原先)DOM 结构中,我们可以看到 DOM 结构进行了预期的变化,如下图所示:
2.3、结语 相关代码实现已经放到 github 上面,有兴趣的同学可以clone运行实验,github地址为:https://github.com/fengshi123/virtual-dom-example%E3%80%82
Virtual DOM 算法主要实现上面三个步骤来实现:
用 JS 对象模拟 DOM 树 — element.js
比较两棵虚拟 DOM 树的差异 — diff.js
将两个虚拟 DOM 对象的差异应用到真正的 DOM 树 — patch.js
三、Vue 源码 Virtual-DOM 简析 我们从第二章节中已经掌握 Virtual DOM 渲染成真实的 DOM 实际上要经历 VNode 的定义、diff、patch 等过程,所以本章节 Vue 源码的解析也按这几个过程来简析。
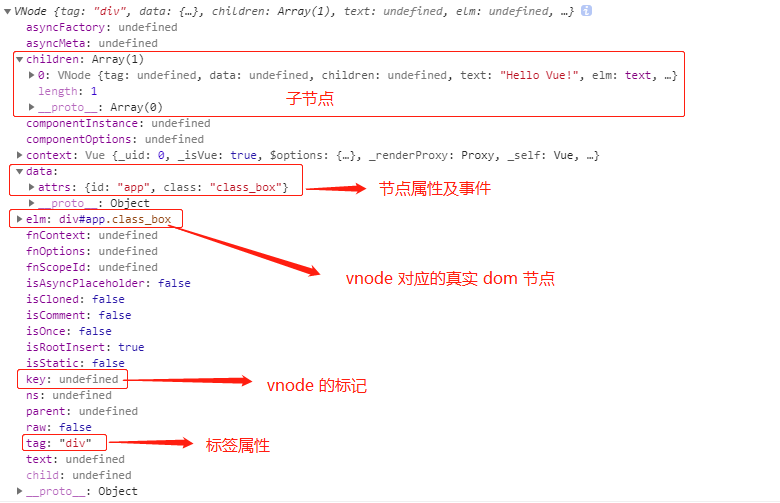
3.1、VNode 模拟 DOM 树 3.1.1、VNode 类简析 在 Vue.js 中,Virtual DOM 是用 VNode 这个 Class 去描述,它定义在 src/core/vdom/vnode.js 中 ,从以下代码块中可以看到 Vue.js 中的 Virtual DOM 的定义较为复杂一些,因为它这里包含了很多 Vue.js 的特性。实际上 Vue.js 中 Virtual DOM 是借鉴了一个开源库 https://github.com/snabbdom/snabbdom 的实现,然后加入了一些 Vue.js 的一些特性。
1
2
3
4
5
6
7
8
9
10
11
12
13
14
15
16
17
18
19
20
21
22
23
24
25
26
27
28
29
30
31
32
33
34
35
36
37
38
39
40
41
42
43
44
45
46
47
48
49
50
51
52
53
54
55
56
57
58
59
60
61
62
63
64
export default class VNode void ;void ;Array <VNode>;void ;void ;void ;void ; void ;void ;void ; void ; Function | void ; Object | void ;Object | void ;void ; Object ; constructor (this .tag = tagthis .data = datathis .children = childrenthis .text = textthis .elm = elmthis .ns = undefined this .context = contextthis .fnContext = undefined this .fnOptions = undefined this .fnScopeId = undefined this .key = data && data.keythis .componentOptions = componentOptionsthis .componentInstance = undefined this .parent = undefined this .raw = false this .isStatic = false this .isRootInsert = true this .isComment = false this .isCloned = false this .isOnce = false this .asyncFactory = asyncFactorythis .asyncMeta = undefined this .isAsyncPlaceholder = false
这里千万不要因为 VNode 的这么属性而被吓到,或者咬紧牙去摸清楚每个属性的意义,其实,我们主要了解其几个核心的关键属性就差不多了,例如:
tag 属性即这个vnode的标签属性data 属性包含了最后渲染成真实dom节点后,节点上的class,attribute,style以及绑定的事件children 属性是vnode的子节点text 属性是文本属性elm 属性为这个vnode对应的真实dom节点key 属性是vnode的标记,在diff过程中可以提高diff的效率
3.1.2、源码创建 VNode 过程 (1)初始化vue
我们在实例化一个 vue 实例,也即 new Vue( ) 时,实际上是执行 src/core/instance/index.js 中定义的 Function 函数。
1
2
3
4
5
6
7
8
function Vue (options ) if (process.env.NODE_ENV !== 'production' &&this instanceof Vue)'Vue is a constructor and should be called with the `new` keyword' )this ._init(options)
通过查看 Vue 的 function,我们知道 Vue 只能通过 new 关键字初始化,然后调用 this._init 方法,该方法在 src/core/instance/init.js 中定义。
1
2
3
4
5
6
7
8
9
10
Vue.prototype._init = function (options?: Object ) const vm: Component = this if (vm.$options.el) {console .log('vm.$options.el:' ,vm.$options.el);
(2)Vue 实例挂载
Vue 中是通过 $mount 实例方法去挂载 dom 的,下面我们通过分析 compiler 版本的 mount 实现,相关源码在目录 src/platforms/web/entry-runtime-with-compiler.js 文件中定义。
1
2
3
4
5
6
7
8
9
10
11
const mount = Vue.prototype.$mountfunction ( el?: string | Element, hydrating?: boolean Component return mount.call(this , el, hydrating)
我们发现最终还是调用用原先原型上的 $mount 方法挂载 ,原先原型上的 $mount 方法在 src/platforms/web/runtime/index.js 中定义 。
1
2
3
4
5
6
7
Vue.prototype.$mount = function ( el?: string | Element, hydrating?: boolean Component undefined return mountComponent(this , el, hydrating)
我们发现$mount 方法实际上会去调用 mountComponent 方法,这个方法定义在 src/core/instance/lifecycle.js 文件中
1
2
3
4
5
6
7
8
9
10
11
12
13
14
15
16
17
18
19
20
21
22
23
24
25
26
27
28
29
30
31
32
33
34
35
export function mountComponent ( vm: Component, el: ?Element, hydrating?: boolean Component let updateComponentif (process.env.NODE_ENV !== 'production' && config.performance && mark) {() =>const vnode = vm._render()else {() =>new Watcher(vm, updateComponent, noop, {if (vm._isMounted && !vm._isDestroyed) {'beforeUpdate' )true )false return vm
从上面的代码可以看到,mountComponent 核心就是先实例化一个渲染Watcher,在它的回调函数中会调用 updateComponent 方法,在此方法中调用 vm._render 方法先生成虚拟 Node,最终调用 vm._update 更新 DOM。
(3)创建虚拟 Node
Vue 的 _render 方法是实例的一个私有方法,它用来把实例渲染成一个虚拟 Node。它的定义在 src/core/instance/render.js 文件中:
1
2
3
4
5
6
7
8
9
10
11
12
13
14
15
16
17
Vue.prototype._render = function (VNode const vm: Component = this const { render, _parentVnode } = vm.$optionslet vnodetry {catch (e) {`render` ){}console .log("vnode...:" ,vnode);return vnode
Vue.js 利用 _createElement 方法创建 VNode,它定义在 src/core/vdom/create-elemenet.js 中:
1
2
3
4
5
6
7
8
9
10
11
12
13
14
15
16
17
18
19
20
21
22
23
24
25
26
27
28
29
30
31
32
33
34
35
36
37
38
39
40
41
42
43
44
45
46
47
48
49
export function _createElement ( context: Component, tag?: string | Class<Component> | Function | Object, data?: VNodeData, children?: any, normalizationType?: number VNode | Array <VNode > if (normalizationType === ALWAYS_NORMALIZE) {else if (normalizationType === SIMPLE_NORMALIZE) {let vnode, nsif (typeof tag === 'string' ) {let Ctorif (config.isReservedTag(tag)) {new VNode(undefined , undefined , contextelse if ((!data || !data.pre) && isDef(Ctor = resolveAsset(context.$options, 'components' , tag))) {else {new VNode(undefined , undefined , contextelse {if (Array .isArray(vnode)) {return vnodeelse if (isDef(vnode)) {if (isDef(ns)) applyNS(vnode, ns)if (isDef(data)) registerDeepBindings(data)return vnodeelse {return createEmptyVNode()
_createElement 方法有 5 个参数,context 表示 VNode 的上下文环境,它是 Component 类型;tag表示标签,它可以是一个字符串,也可以是一个 Component;data 表示 VNode 的数据,它是一个 VNodeData 类型,可以在 flow/vnode.js 中找到它的定义;children 表示当前 VNode 的子节点,它是任意类型的,需要被规范为标准的 VNode 数组;
3.1.3、实例查看 为了更直观查看我们平时写的 Vue 代码如何用 VNode 类来表示,我们通过一个实例的转换进行更深刻了解。
例如,实例化一个 Vue 实例:
1
2
3
4
5
6
7
8
9
10
11
12
13
14
var app = new Vue({'#app' ,function (createElement ) return createElement('div' , {'app' ,this .message)'Hello Vue!'
我们打印出其对应的 VNode 表示:
3.2、diff 过程 3.2.1、Vue.js 源码的 diff 调用逻辑 Vue.js 源码实例化了一个 watcher,这个 ~ 被添加到了在模板当中所绑定变量的依赖当中,一旦 model 中的响应式的数据发生了变化,这些响应式的数据所维护的 dep 数组便会调用 dep.notify() 方法完成所有依赖遍历执行的工作,这包括视图的更新,即 updateComponent 方法的调用。watcher 和 updateComponent方法定义在 src/core/instance/lifecycle.js 文件中 。
1
2
3
4
5
6
7
8
9
10
11
12
13
14
15
16
17
18
19
20
21
22
23
24
25
26
27
28
29
30
31
32
33
34
35
export function mountComponent ( vm: Component, el: ?Element, hydrating?: boolean Component let updateComponentif (process.env.NODE_ENV !== 'production' && config.performance && mark) {() =>const vnode = vm._render()else {() =>new Watcher(vm, updateComponent, noop, {if (vm._isMounted && !vm._isDestroyed) {'beforeUpdate' )true )false return vm
完成视图的更新工作事实上就是调用了vm._update方法,这个方法接收的第一个参数是刚生成的Vnode,调用的vm._update方法定义在 src/core/instance/lifecycle.js中。
1
2
3
4
5
6
7
8
9
10
11
12
13
14
15
16
17
18
19
20
21
22
23
24
25
26
Vue.prototype._update = function (vnode: VNode, hydrating?: boolean ) const vm: Component = this const prevEl = vm.$elconst prevVnode = vm._vnodeconst restoreActiveInstance = setActiveInstance(vm)if (!prevVnode) {false )else {if (prevEl) {null if (vm.$el) {if (vm.$vnode && vm.$parent && vm.$vnode === vm.$parent._vnode) {
在这个方法当中最为关键的就是 vm.__patch__ 方法,这也是整个 virtual-dom 当中最为核心的方法,主要完成了prevVnode 和 vnode 的 diff 过程并根据需要操作的 vdom 节点打 patch,最后生成新的真实 dom 节点并完成视图的更新工作。
接下来,让我们看下 vm.__patch__ 的逻辑过程, vm.__patch__ 方法定义在 src/core/vdom/patch.js 中。
1
2
3
4
5
6
7
8
9
10
11
12
13
14
15
16
function patch (oldVnode, vnode, hydrating, removeOnly ) if (isUndef(oldVnode)) {true else {const isRealElement = isDef(oldVnode.nodeType)if (!isRealElement && sameVnode(oldVnode, vnode)) {null , null , removeOnly)
在 patch 方法中,我们看到会分为两种情况,一种是当 oldVnode 不存在时,会创建新的节点;另一种则是已经存在 oldVnode ,那么会对 oldVnode 和 vnode 进行 diff 及 patch 的过程。其中 patch 过程中会调用 sameVnode 方法来对对传入的2个 vnode 进行基本属性的比较,只有当基本属性相同的情况下才认为这个2个vnode 只是局部发生了更新,然后才会对这2个 vnode 进行 diff,如果2个 vnode 的基本属性存在不一致的情况,那么就会直接跳过 diff 的过程,进而依据 vnode 新建一个真实的 dom,同时删除老的 dom 节点。
1
2
3
4
5
6
7
8
9
function sameVnode (a, b ) return (
diff 过程中主要是通过调用 patchVnode 方法进行的:
1
2
3
4
5
6
7
8
9
10
11
12
13
14
15
16
17
18
19
20
21
22
23
24
25
26
27
28
29
30
31
function patchVnode (oldVnode, vnode, insertedVnodeQueue, ownerArray, index, removeOnly ) const elm = vnode.elm = oldVnode.elmconst oldCh = oldVnode.childrenconst ch = vnode.childrenif (isUndef(vnode.text)) {if (isDef(oldCh) && isDef(ch)) {if (oldCh !== ch) updateChildren(elm, oldCh, ch, insertedVnodeQueue, removeOnly)else if (isDef(ch)) {if (process.env.NODE_ENV !== 'production' ) {if (isDef(oldVnode.text)) nodeOps.setTextContent(elm, '' )null , ch, 0 , ch.length - 1 , insertedVnodeQueue)else if (isDef(oldCh)) {0 , oldCh.length - 1 )else if (isDef(oldVnode.text)) {'' )else if (oldVnode.text !== vnode.text) {
从以上代码得知,
diff 过程中又分了好几种情况,oldCh 为 oldVnode的子节点,ch 为 Vnode 的子节点:
首先进行文本节点的判断,若 oldVnode.text !== vnode.text,那么就会直接进行文本节点的替换;
在vnode 没有文本节点的情况下,进入子节点的 diff;
当 oldCh 和 ch 都存在且不相同的情况下,调用 updateChildren 对子节点进行 diff;
若 oldCh 不存在,ch 存在,首先清空 oldVnode 的文本节点,同时调用 addVnodes 方法将 ch 添加到elm 真实 dom 节点当中;
若 oldCh 存在,ch 不存在,则删除 elm 真实节点下的 oldCh 子节点;
若 oldVnode 有文本节点,而 vnode 没有,那么就清空这个文本节点。
3.2.2、子节点 diff 流程分析 (1)Vue.js 源码
这里着重分析下 updateChildren方法,它也是整个 diff 过程中最重要的环节,以下为 Vue.js 的源码过程,为了更形象理解 diff 过程,我们给出相关的示意图来讲解。
1
2
3
4
5
6
7
8
9
10
11
12
13
14
15
16
17
18
19
20
21
22
23
24
25
26
27
28
29
30
31
32
33
34
35
36
37
38
39
40
41
42
43
44
45
46
47
48
49
50
51
52
53
54
55
56
57
58
59
60
61
62
63
64
function updateChildren (parentElm, oldCh, newCh, insertedVnodeQueue, removeOnly ) let oldStartIdx = 0 let newStartIdx = 0 let oldEndIdx = oldCh.length - 1 let oldStartVnode = oldCh[0 ]let oldEndVnode = oldCh[oldEndIdx]let newEndIdx = newCh.length - 1 let newStartVnode = newCh[0 ]let newEndVnode = newCh[newEndIdx]let oldKeyToIdx, idxInOld, vnodeToMove, refElmwhile (oldStartIdx <= oldEndIdx && newStartIdx <= newEndIdx) {if (isUndef(oldStartVnode)) {else if (isUndef(oldEndVnode)) {else if (sameVnode(oldStartVnode, newStartVnode)) {else if (sameVnode(oldEndVnode, newEndVnode)) {else if (sameVnode(oldStartVnode, newEndVnode)) { else if (sameVnode(oldEndVnode, newStartVnode)) { else {if (isUndef(oldKeyToIdx)) oldKeyToIdx = createKeyToOldIdx(oldCh, oldStartIdx, oldEndIdx)if (isUndef(idxInOld)) { false , newCh, newStartIdx)else {if (sameVnode(vnodeToMove, newStartVnode)) {undefined else {false , newCh, newStartIdx)if (oldStartIdx > oldEndIdx) {1 ]) ? null : newCh[newEndIdx + 1 ].elmelse if (newStartIdx > newEndIdx) {
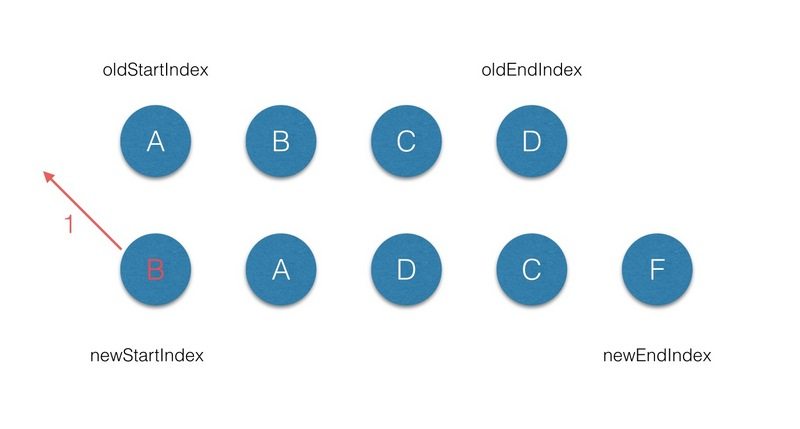
在开始遍历 diff 前,首先给 oldCh 和 newCh 分别分配一个 startIndex 和 endIndex 来作为遍历的索引,当oldCh 或者 newCh 遍历完后(遍历完的条件就是 oldCh 或者 newCh 的 startIndex >= endIndex ),就停止oldCh 和 newCh 的 diff 过程。接下来通过实例来看下整个 diff 的过程(节点属性中不带 key 的情况)。
(2)无 key 的 diff 过程
我们通过以下示意图对以上代码过程进行讲解:
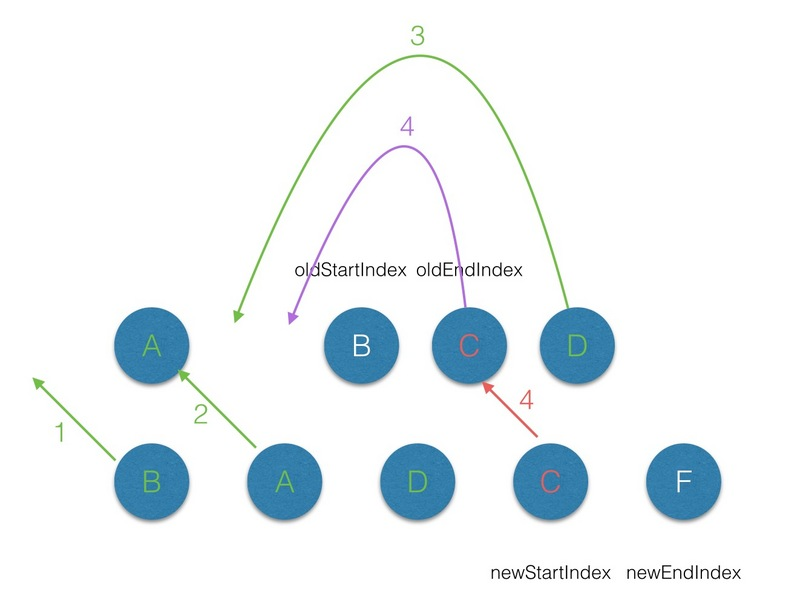
(2.1)首先从第一个节点开始比较,不管是 oldCh 还是 newCh 的起始或者终止节点都不存在 sameVnode ,同时节点属性中是不带 key标记的,因此第一轮的 diff 完后,newCh的 startVnode 被添加到 oldStartVnode的前面,同时 newStartIndex前移一位;
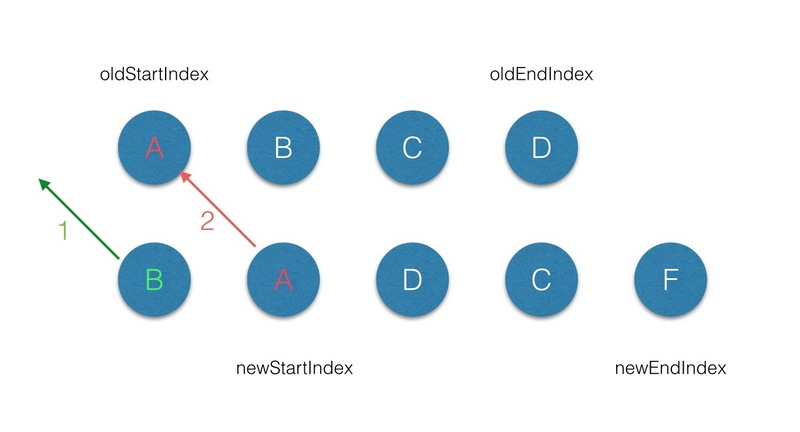
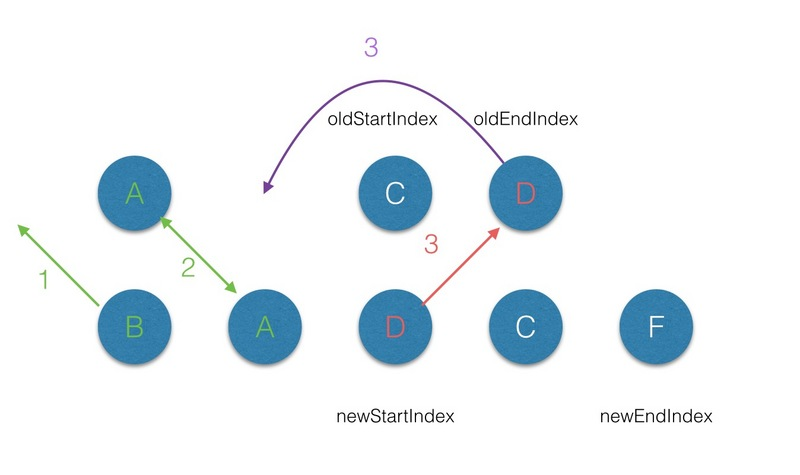
(2.2)第二轮的 diff中,满足 sameVnode(oldStartVnode, newStartVnode),因此对这2个 vnode 进行diff,最后将 patch 打到 oldStartVnode 上,同时 oldStartVnode和 newStartIndex 都向前移动一位 ;
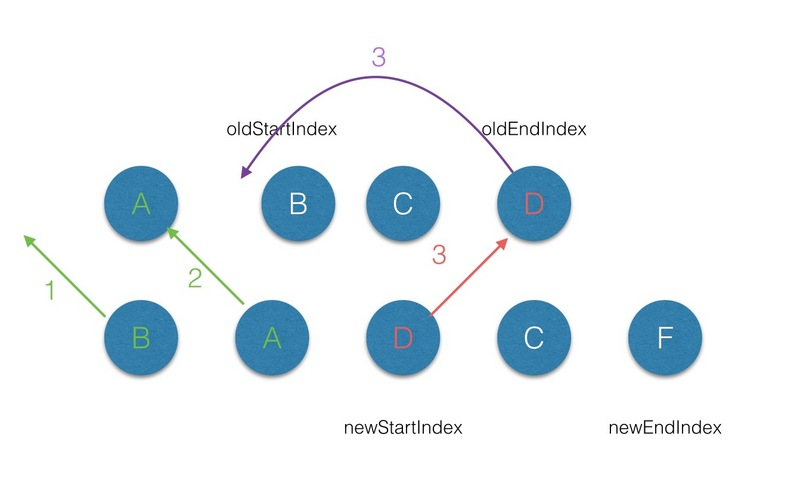
(2.3)第三轮的 diff 中,满足 sameVnode(oldEndVnode, newStartVnode),那么首先对 oldEndVnode和newStartVnode 进行 diff,并对 oldEndVnode进行 patch,并完成 oldEndVnode 移位的操作,最后newStartIndex前移一位,oldStartVnode 后移一位;
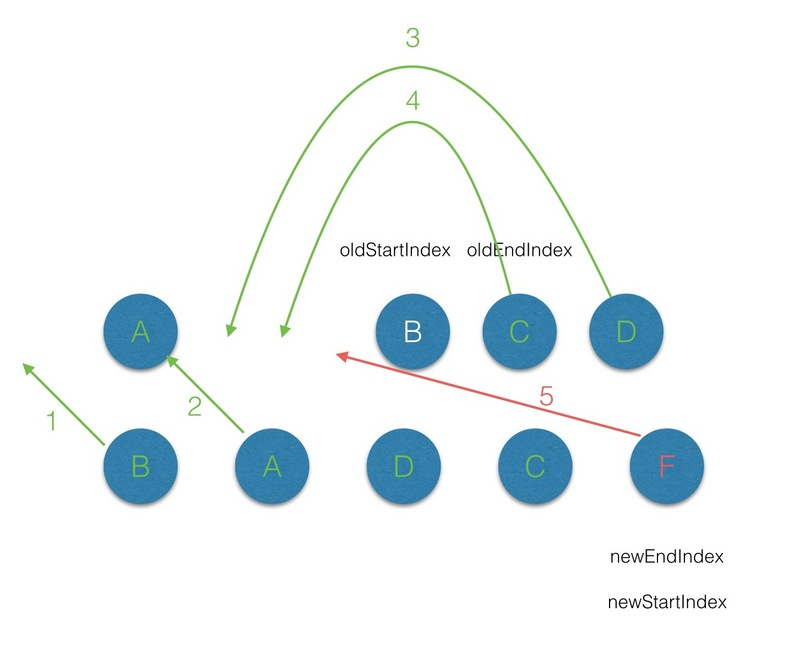
(2.4)第四轮的 diff中,过程同步骤3;
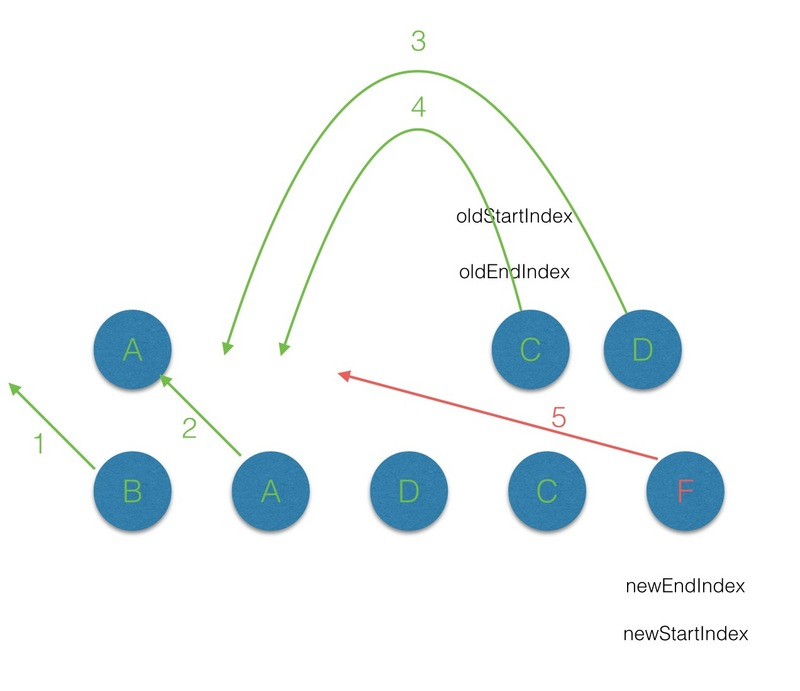
(2.5)第五轮的 diff 中,同过程1;
(2.6)遍历的过程结束后,newStartIdx > newEndIdx,说明此时 oldCh 存在多余的节点,那么最后就需要将这些多余的节点删除。
(3)有 key 的 diff 流程
在 vnode 不带 key 的情况下,每一轮的 diff 过程当中都是起始和结束节点进行比较,直到 oldCh 或者newCh 被遍历完。而当为 vnode 引入 key 属性后,在每一轮的 diff 过程中,当起始和结束节点都没有找到sameVnode 时,然后再判断在 newStartVnode 的属性中是否有 key,且是否在 oldKeyToIndx 中找到对应的节点 :
如果不存在这个 key,那么就将这个 newStartVnode作为新的节点创建且插入到原有的 root 的子节点中;
如果存在这个 key,那么就取出 oldCh 中的存在这个 key 的 vnode,然后再进行 diff 的过;
通过以上分析,给vdom上添加 key属性后,遍历 diff 的过程中,当起始点 ,结束点 的搜寻 及 diff 出现还是无法匹配的情况下时,就会用 key 来作为唯一标识,来进行 diff,这样就可以提高 diff 效率。
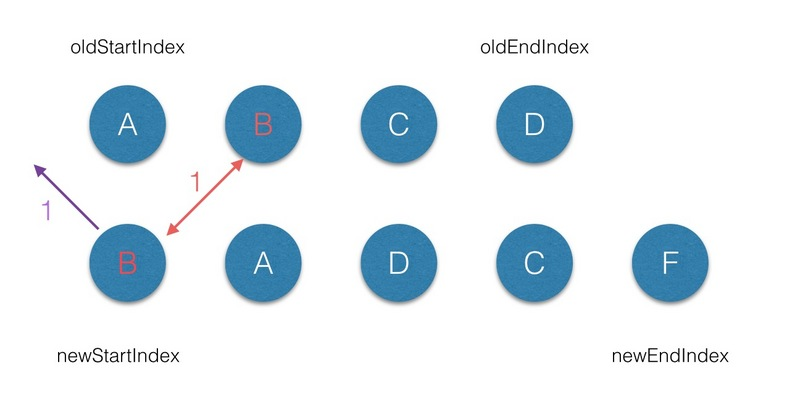
带有 Key属性的 vnode的 diff 过程可见下图:
(3.1)首先从第一个节点开始比较,不管是 oldCh 还是 newCh 的起始或者终止节点都不存在 sameVnode,但节点属性中是带 key 标记的, 然后在 oldKeyToIndx 中找到对应的节点,这样第一轮 diff 过后 oldCh 上的B节点被删除了,但是 newCh 上的B节点上 elm 属性保持对 oldCh 上 B节点 的elm引用。
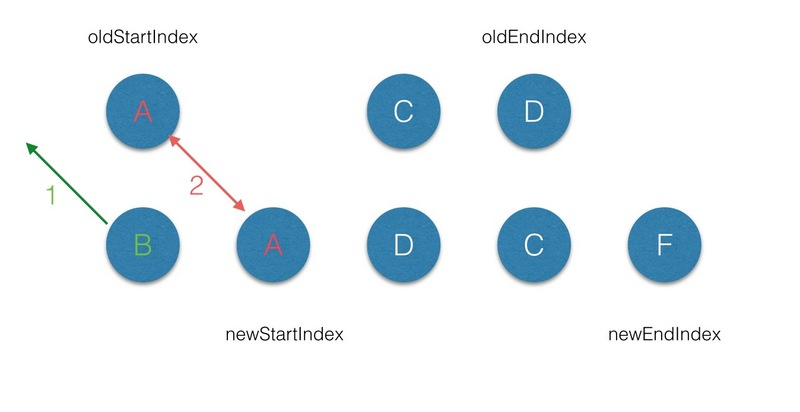
(3.2)第二轮的 diff 中,满足 sameVnode(oldStartVnode, newStartVnode),因此对这2个 vnode 进行diff,最后将 patch 打到 oldStartVnode上,同时 oldStartVnode 和 newStartIndex 都向前移动一位 ;
(3.3)第三轮的 diff中,满足 sameVnode(oldEndVnode, newStartVnode),那么首先对 oldEndVnode 和newStartVnode 进行 diff,并对 oldEndVnode 进行 patch,并完成 oldEndVnode 移位的操作,最后newStartIndex 前移一位,oldStartVnode后移一位;
(3.4)第四轮的diff中,过程同步骤2;
(3.5)第五轮的diff中,因为此时 oldStartIndex 已经大于 oldEndIndex,所以将剩余的 Vnode 队列插入队列最后。
3.3、patch 过程 通过3.2章节介绍的 diff 过程中,我们会看到 nodeOps 相关的方法对真实 DOM 结构进行操作,nodeOps 定义在 src/platforms/web/runtime/node-ops.js 中,其为基本 DOM 操作,这里就不在详细介绍。
1
2
3
4
5
6
7
8
9
10
11
12
13
14
15
16
17
18
19
export function createElementNS (namespace: string, tagName: string ): Element return document .createElementNS(namespaceMap[namespace], tagName)export function createTextNode (text: string ): Text return document .createTextNode(text)export function createComment (text: string ): Comment return document .createComment(text)export function insertBefore (parentNode: Node, newNode: Node, referenceNode: Node ) export function removeChild (node: Node, child: Node )
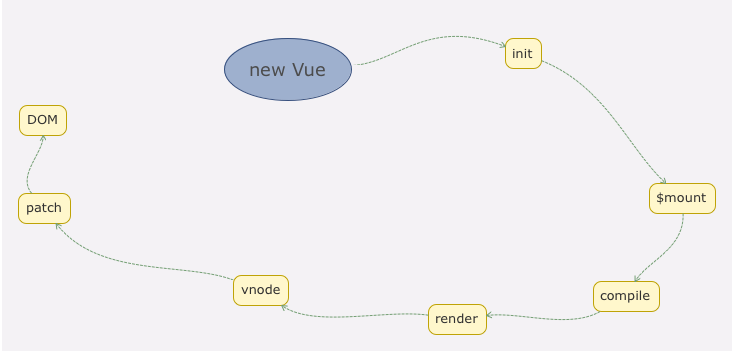
3.4、总结 通过前三小节简析,我们从主线上把模板和数据如何渲染成最终的 DOM 的过程分析完毕了,我们可以通过下图更直观地看到从初始化 Vue 到最终渲染的整个过程。
Reference 文章摘自,侵删: